Anniversary Heart Cake
published on

This heart shaped cake is perfect for an anniversary, Valentine’s day, or even an intimate wedding. It’s a vegan 2-layer chocolate cake with vanilla almond buttercream.
This recipe makes 1 heart cake that serves 12-20.
Table of Contents
(click the links below to skip to the section you’re looking for)
- Vegan Cake Recipe
- Vegan Frosting Recipe
- Cake Decoration
- Tips and FAQ
- Ingredient Substitutions
- Video
- Contact Me with Questions
- Alternative Cake Recipes
♫ Listening to ♫
Heartbeat Highway by Cannons
I’ve been making cakes for over 20 years, and even I find heart shaped cakes a little bit challenging. Go easy on yourself if you don’t get the frosting perfectly smooth. Nobody else will notice but you (I say this from experience).
If you’re a perfectionist, I have some round cake alternatives in the other recipes section at the end of this recipe. No matter what shape you go with, I promise that anniversaries are always better with cake.
Ingredients you need for an Anniversary Heart Cake
(jump to the substitutions section to see ingredient details and suggestions for substitutions)
- ¾ cup (54g) cocoa powder
- 2 cups (260g) flour
- 1 ½ teaspoon (9-10g) baking soda
- 2 teaspoons (10g) baking powder
- 1 ⅓ cups (300g) organic sugar
- ½ cup (90g) safflower oil
- 1 cup (236ml/243g) nondairy milk
- ½ cup (130g) vegan yogurt
- 2 teaspoons (8g) vanilla extract
- 4-5 pinches of salt (optional)
- ½ cup (110g) hot water or hot coffee
- 2 tablespoons (30g) lemon juice
How to Make a Chocolate Heart Cake for Your Anniversary
prep time: 20 min | bake time: 27 min
Dollhouse Shortcut
Bake and assemble the cake 1-2 days ahead of time, cover completely in a crumb coat, and wrap it well in cling wrap once the crumb coat is hard to the touch. Chill in the fridge or the freezer until you’re ready to decorate.
Preheat the oven to 350ºF (175ºC).
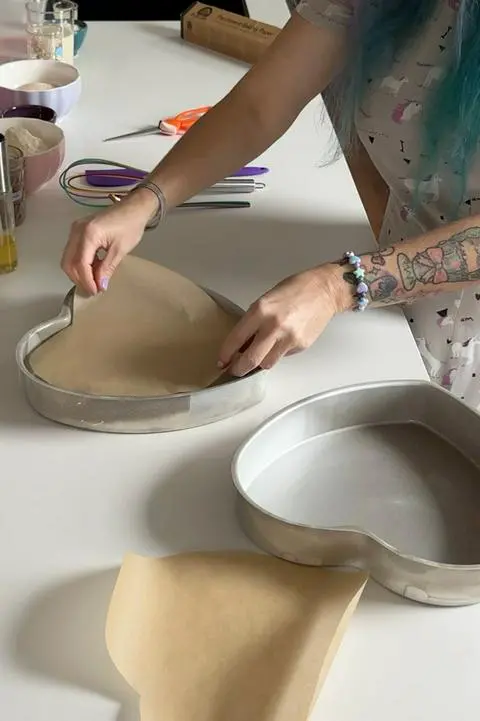
Cut 2 pieces of parchment paper the size and shape of your heart cake pans. I set my cake pans on my parchment paper, trace them with a pen, and then cut a few mm inside the pen outline.
Oil the bottom and sides of both of the heart cake pans using the same oil you use in the cake batter recipe.
Set the parchment paper hearts in the bottom of the heart cake pans. Adjust it if needed so it lies flat with no wrinkles and is centered as much as possible. Prepping the pans usually takes me about 6 minutes.
Sift and whisk the dry ingredients together. The dry ingredients are ¾ cup (54g) cocoa powder, 2 cups (260g) flour, 1 ½ teaspoon (9-10g) baking soda, 2 teaspoons (10g) baking powder, and 1 ⅓ cups (300g) organic sugar. You can also add a few large pinches of salt, but it’s optional. This step takes me 3 minutes.
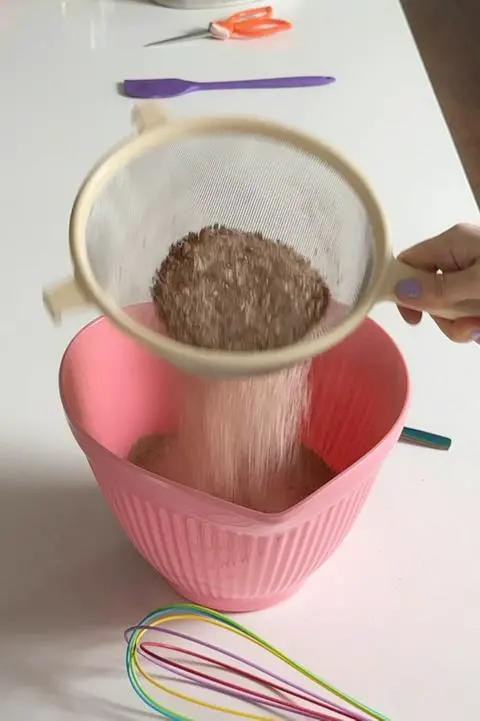
Set the dry ingredients aside for now.
Mix the wet ingredients either in the mixing bowl of a stand mixer fitted with a paddle attachment. You can use a handheld electric mixer and a large mixing bowl if you don’t have a stand mixer (or mix by hand if you don’t have either). The wet ingredients are ½ cup (90g) safflower oil, 1 cup (240g) nondairy milk, ½ cup (130g) vegan yogurt, and 2 teaspoons (8g) vanilla extract. This step takes me 4 minutes.
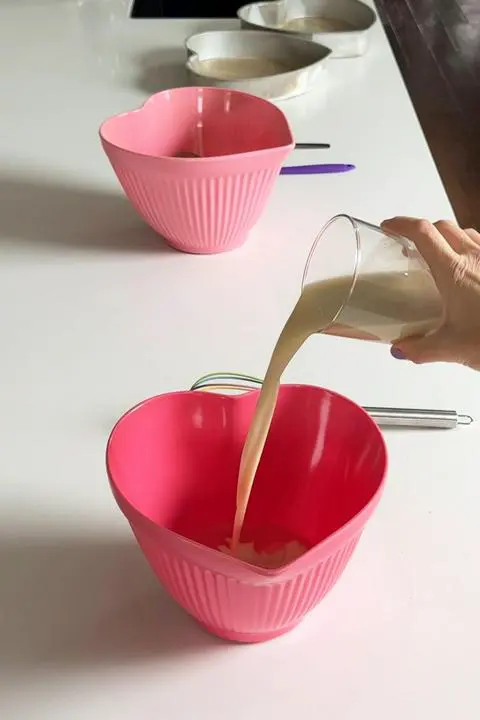
Mix the wet ingredients and the dry ingredients until you can no longer see any dry ingredients. This mixture will be thick.
Scrape the sides and bottom of the bowl with a baking spatula. This will make sure no dry ingredients are sneakily hiding from you.
Pour ½ cup (110g) hot water or hot coffee into the cake batter and mix until the batter is all one color. This step will help to bloom the cocoa powder. If you accidentally added the hot liquid when you mixed the wet ingredients, don’t worry. The cake will still turn out great.
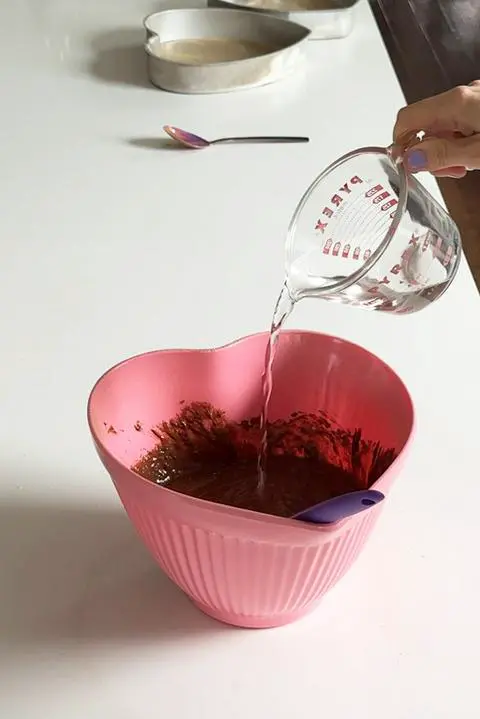
Check the oven to make sure it’s heated to 350ºF (175ºC) before this next step. If it’s not, wait for it to be before starting the next step.
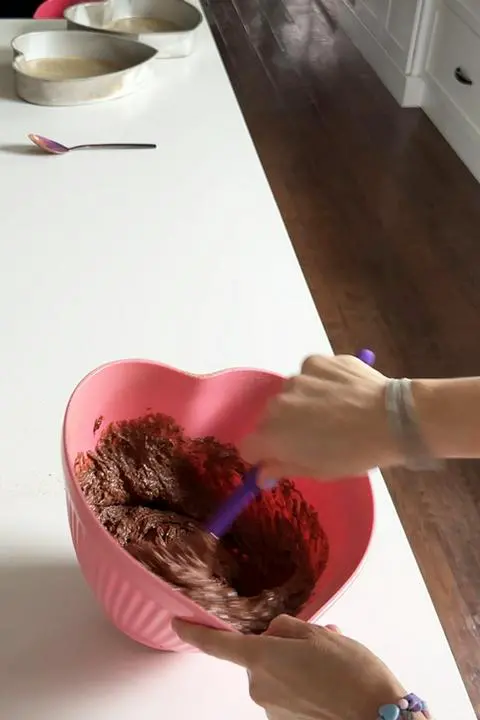
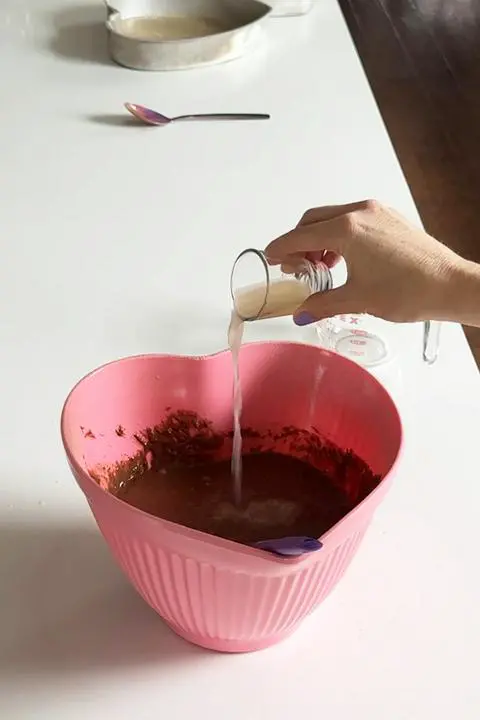
Add the 2 tablespoons (30g) of lemon juice to the batter, and stir it gently until it’s mixed in.
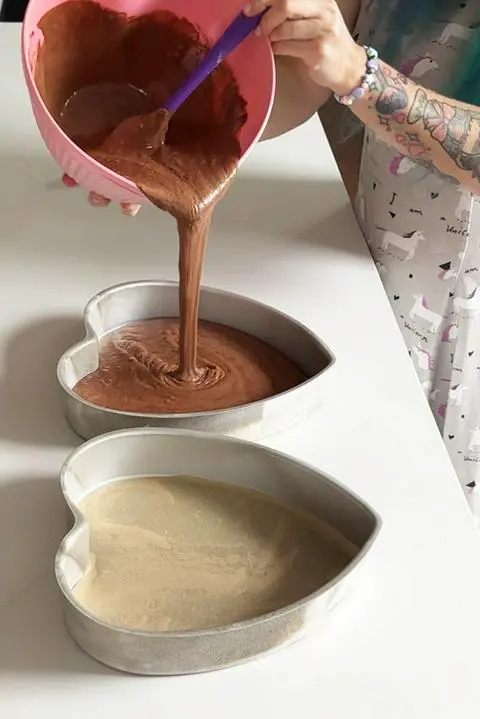
Pour half of the chocolate cake batter into each of the parchment-lined heart cake pans. Shake the cake pans a little to get the batter to spread evenly on the bottom of each pan. Some people tap the cake pans on the counter, but this could knock out too much air and make your cake rise less in the oven, so I don’t recommend this. Use a silicone spatula to make sure you get all the batter and don’t waste any.
Set the cake pans on the same rack in the oven, preferably the one that’s most in the middle. This will help them bake evenly and at the same rate.
Bake at 350ºF (175ºC) for 27-32 minutes, or until you can stick a toothpick in the center of the cakes and it comes out clean. I baked mine for 27 minutes, but my oven runs hot.
Remove the cakes from the oven and set them on cooling racks.
Cool the cakes on the cooling racks for at least 10 minutes.
Flip the cake pans and set them upside down on the cooling racks to cool the rest of the way. If your cake pans are high quality, your cakes may fall out of the cake pans when you flip them. If that happens, go ahead and remove the cake pans and wash them. My heart pans are made by wilton, and I put them in the dishwasher (because I’m lazy) so they aren’t the best quality.
Cool the cakes the rest of the way. It usually takes around an hour for cakes to cool, but it could take longer. You want to cool them until when you touch them, they no longer feel warm. If you don’t have that kind of time, stick them in the freezer, and they’ll cool much faster.
Remove the cooled cakes from the cake pan if they haven’t fallen out on their own. sometimes we forget to flip the cake pans over after 10 minutes. If we forget, then the cakes won’t fall out on their own. Not a problem. Simply shimmy a baking spatula around the perimeter of the cake pan to loosen the cake from the sides.
Wrap each layer of vegan chocolate cake in cling wrap if you’re baking these cakes in advance of when you plan to assemble and decorate the cake. If you’re ready to assemble, jump to the assembly and decoration steps. If you still need to make the frosting, see the next section.
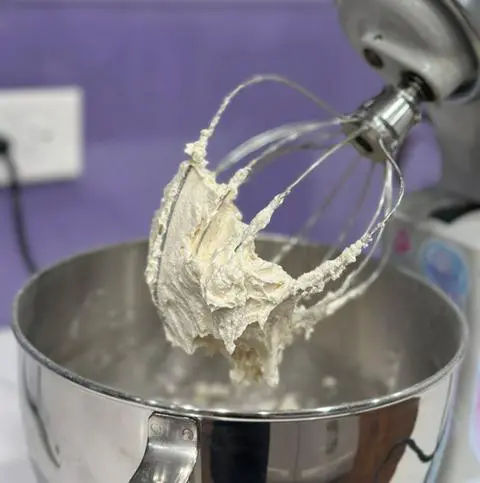
How to Make the Frosting for An Anniversary Cake
prep time: 15min
Follow the instructions in my almond frosting recipe to make a frosting that tastes like wedding cake frosting.
At this point, you can skip to the assembly and decoration stage, or you can color your frosting. For colors, your options are unlimited.
One option is to use your partner’s favorite color if they have one. Another is to choose colors that are sentimental to you.
If you want an anniversary cake that is bright white like a wedding cake, add white food coloring to the frosting. You’re probably thinking that’s silly because frosting is already white, but this will bring it from an off white to a true white.
If you’re coloring your frosting, continue reading. If you want a more natural cake, skip to assembly and decoration (although, there are options for natural food coloring).
Decide how many colors of frosting you want, and divide the frosting into that many bowls. If you’re just using one single color, leave the white frosting in the mixing bowl.
Add vegan food coloring to the frosting and mix it in until the color is uniform. Frosting is a good time to use all-natural colors, because natural colors do well when they don’t bake. When using powdered food coloring, turn it into a paste or gel consistency before adding it to your frosting. Add a tiny amount of room temperature nondairy milk or creamer to a small bowl or ramekin and mix with the powdered food coloring. Then add that to the frosting. If you add powdered food coloring straight to frosting, it won’t always blend well.

How to Assemble and Decorate an Anniversary Heart Cake
prep time: 38 min | wait time: 15-30 min
Cut the domes off the cakes to make them flat if needed. This step isn’t always needed, but it helps you use less frosting in between the cake layers if they are level. Besides, if you trim some cake off the top, you get to sample the cake. And you know how important quality control is, haha. For the pictures you see here, I did not level the cakes. My heart pans are so large that the cakes didn’t have domes. It was like baking a thin cake in a sheet pan.
Set the bottom cake layer onto your cake plate or cake stand.
Spread frosting all over the top of the first cake layer.
Set the top cake layer on top of that frosting layer, aligning the hearts as closely as possible.
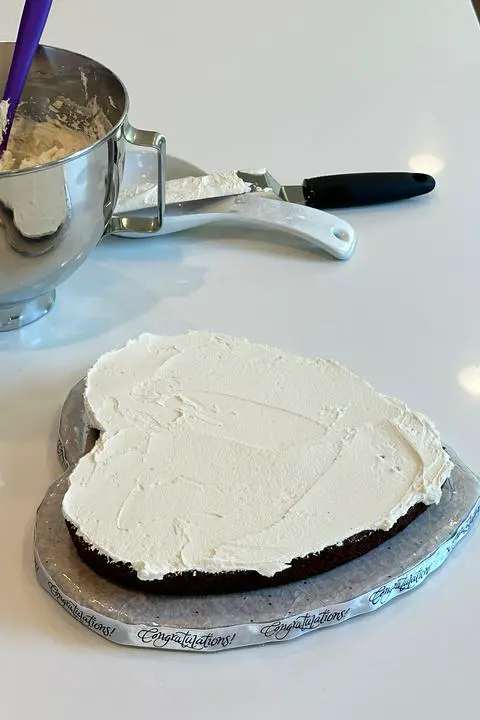
Fill in the gaps on the sides between the 2 cake layers as best as you can.
Smooth the sides using an offset spatula and/or a bench scraper.
Cover the entire cake in a thin layer of frosting, called the crumb coat. If crumbs get in it (and they will), it’s ok because you’ll cover the crumb coat with the final coat. Assembling the cake and doing the crumb coat took me 16 minutes.
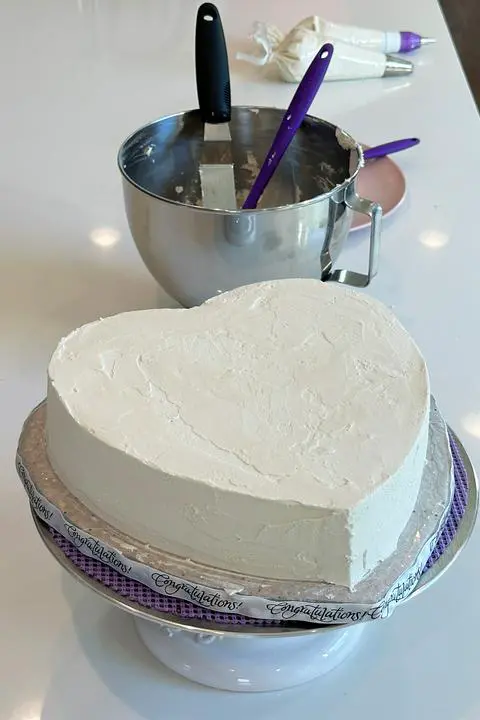
Chill the cake with the crumb coat for at least 15 minutes in the freezer. Remove it when you’re ready to decorate it or wrap it in cling wrap to decorate later. While you wait, you can prepare your piping bags.
Fill a piping bag fitted with your piping tip of choice. I used wilton tip 6B, which is a large open star tip. If you have a helper, ask them to hold the bag open for you while you fill it. If you don’t have that luxury, I recommend using a vase, glass, jar, or pitcher. Choose a dish that’s tall enough to fit your piping bag. But make sure it has an opening the right size to fold the edges of the piping bag over.
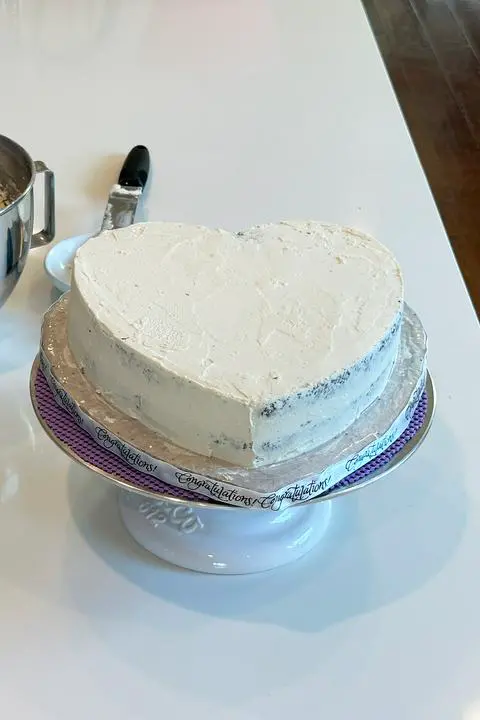
Remove the cake from the freezer once the crumb coat is hard to the touch.
Cover the cake in frosting, hiding the entire crumb coat.
Smooth out the frosting as much or as little as you want. This step took me about 8 minutes because I spent extra time using an offset spatula on the top and a bench scraper on the sides.
Cake decorating may not be a skill you possess. Or maybe it doesn’t interest you. If that describes you, I recommend covering any imperfections in vegan sprinkles.
If you plan to write a message on your anniversary cake, do that before piping your borders. If not, skip the next couple of steps.
Chill the cake in the fridge or freezer until the frosting is hard to the touch. This will allow you to scrape off the writing if you make a mistake so you can start over.
Transfer some of the frosting to a deco pen or a piping bag fitted with a small round tip.
Practice writing your message on a plate or a piece of parchment paper first. This will help you get comfortable with it before doing it on the cake.
Write a cute message on the top of the heart cake. Use a decopen filled with frosting or a piping bag filled only ⅓ of the way with frosting.
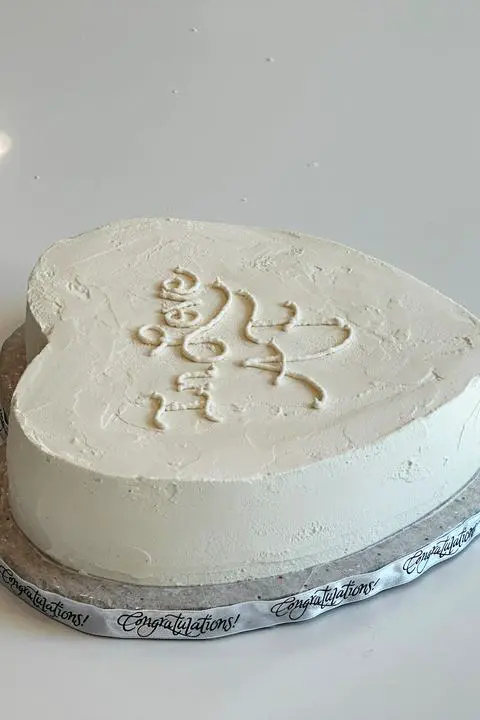
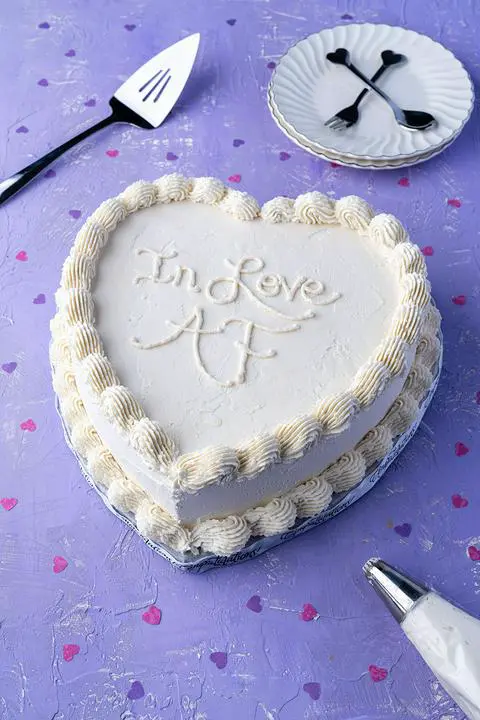
Depending on the size of your cake and the size of your handwriting, the length of your message can vary vastly. For example, a 4-inch cake can really only fit 2 rows of 4 characters each. When I made this cake for my friend Kimmy’s wedding, I wrote In Love AF because she likes that mushy crap. For more ideas, check out my list of messages you can write on anniversary cakes or wedding cakes.
Pipe frosting in a shell border around the top and bottom perimeter of the cake. I spent 14 minutes writing my message and piping borders on my cake.
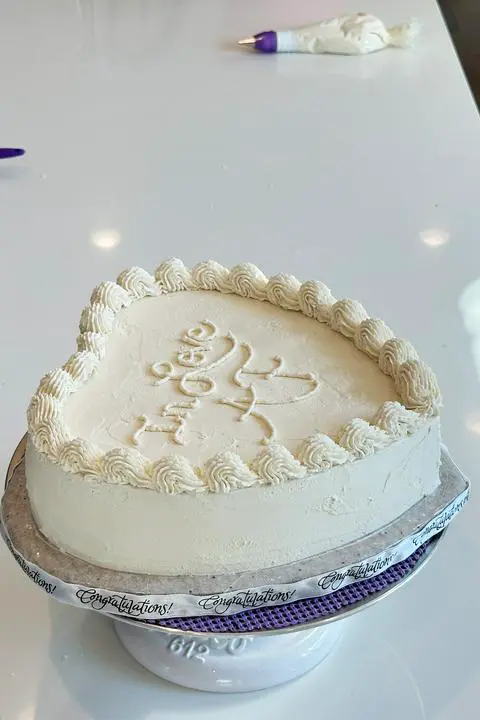
Chill the decorated cake in the fridge or freezer until you’re ready to deliver it or serve it. I took my cake on a 2-hour car ride to a wedding, so I froze it overnight.
Tips / Questions and Answers
Can I do any steps in advance to save time on anniversary day?
There are two ways to get a head start on this anniversary cake.
One is to wait until the cakes are cooled, and wrap them in cling wrap. Then leave the wrapped cakes in the fridge or freezer until cake decorating day. If they’ll be in the freezer for more than a couple of days, place the cling wrapped cakes into a ziplock freezer bag.
The other is to assemble the cake, do the crumb coat of frosting, and chill the cake. Once the crumb coat is hard to the touch, wrap the whole cake in cling wrap. Return it to the freezer or fridge until you’re ready to decorate it.
Can I make this cake in a 9x13 baking pan or a 12x18 sheet pan?
You can make this heart cake in a different pan if you don’t have heart pans. Once the cake cools completely, you’ll cut out 2 equal sized heart shapes (use a piece of parchment cut into a heart shape as your template).
How do I store an anniversary heart cake?
If it’s summer, you might want to store it in the fridge. If it’s winter, you can leave it out on the counter in a cake dome.
You can store uncut cake in the fridge uncovered, because the frosting acts as a barrier to protect the cake from drying out. Once you’ve cut a cake, cover the cut part with cling wrap before storing it in the fridge.
If you won’t eat the cake within a week, cut the cake into individual slices, wrap each slice in cling wrap, and place the slices in a ziplock freezer bag. Then you can freeze them for up to 3 months.
Can I order a vegan anniversary heart cake from the Vegan Dollhouse instead of making it myself?
I might be willing to make you a custom cake if you live in northern California. Reach out to me if you’d like a quote. But be warned that I charge a lot, haha.
How can I travel with this cake to make sure it doesn’t get injured on the journey?
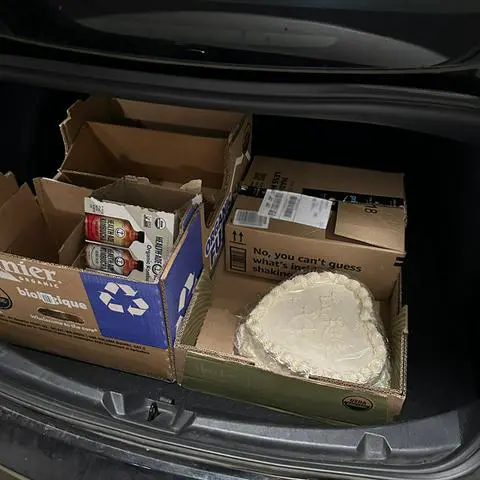
The best method of traveling with cake is to freeze the cake overnight so that the 2-3 hours a cake takes to defrost will happen on the road trip. I travel with cakes often. I always make sure it fits snugly into a box in the trunk of the car so it doesn’t move at all. Plan for the worst. You never know when you might have to slam on your brakes. So, you want that cake to have zero chance of moving around. Leave your cling wrap on the cake until the cake has arrived safely at its destination and then carefully remove it. This will help any condensation from the defrosting collect on the cling wrap instead of on your cake.
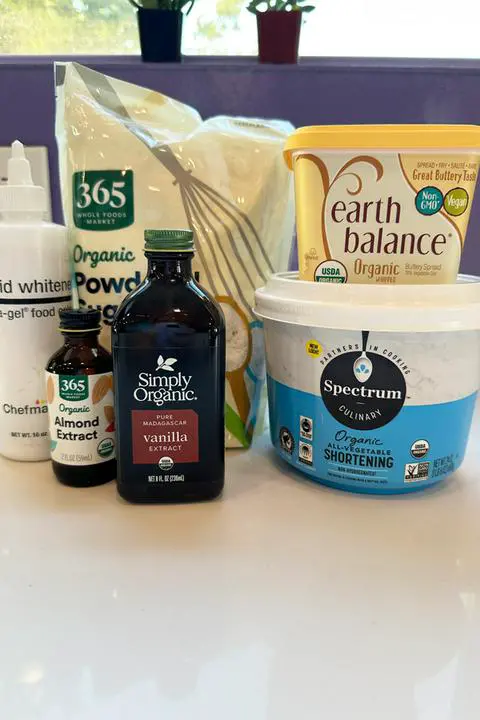
Ingredient Substitutions
- Parchment Paper: I know parchment paper isn’t an ingredient, but I wanted to add a substitution for it. If you don’t have parchment paper, just oil the bottom and sides of both cake pans. The purpose of the parchment paper is to help the cakes come out of the cake pans easier. Also, some parchment paper isn’t vegan, so make sure you buy the kind I link to here.
- Cocoa: I use fair trade, organic cocoa powder, but you can use whatever kind you have. Don’t have cocoa powder? Replace ¾ cup cocoa powder and ½ cup hot coffee or water in this recipe with 1 cup (6oz/170g) of melted vegan chocolate chips. This will produce a less moist cake, but it still tastes good.
- Flour: I used unbleached, all-purpose flour when I made this anniversary cake. If you prefer to use whole grain flours, replace the white flour in this recipe with cake flour, wheat flour, spelt flour, or whole wheat pastry flour. It will taste healthier with some of these flours though. You can also replace the flour in this recipe with your favorite gluten-free flour blend if you’re making this cake for someone who avoids gluten.
- Baking Soda: Out of baking soda? Replace the 1 ½ teaspoons (9-10g) baking soda with an extra 1 ½ tablespoons baking powder.
- Baking Powder: I use the non-aluminum baking powder, because I need all the brain cells I have left. Out of baking powder? Replace the 2 teaspoons (10g) baking powder in this recipe with an extra ½ teaspoon (3g) baking soda.
- Sugar: I used organic sugar because it’s super cheap at Costco. You can use any number of vegan sugars: sucanat, coconut sugar, raw sugar, organic sugar, or demerara. If you’re not sure if your sugar is vegan, you can contact the company and ask. Or just avoid conventional white sugar or granulated sugar, and you should be ok.
- Oil: I recommend safflower, sunflower, avocado, or coconut oil for baking cakes. These oils are good for high heat, which helps you avoid transfats. But, you can use any other plant-based oil. Examples are vegetable oil, canola oil, and grapeseed oil. People even make cakes with olive oil, but I don’t recommend it.
- Nondairy Milk: You can use any kind of milk in the cake and filling. I used oatly milk because that’s what I had in my fridge. Otherwise, just buy the cheapest vegan milk you can find. Don’t have the full amount of nondairy milk that the cake recipe requires? Substitute any amount with water, coffee, or nondairy creamer. You can also mix and match different nondairy milks. I do this if my macadamia milk only has a little bit left at the bottom. I use it up, and then I open a new container of almond, oat, or soymilk. If you use soy milk, I recommend buying organic or non-GMO.
- Vegan Yogurt: You can use any brand of vegan yogurt you prefer in this recipe. I personally like to make my own yogurt, because my instant pot has a yogurt setting. Not sure which vegan yogurts are good or bad tasting? Check out the results of my vegan yogurt blind taste test. Forager, So Delicious, and Kite Hill are all good options.
- Vanilla Extract: If you don’t have vanilla extract, you can omit it, but the cake will taste much better if you include it. I use 100% pure vanilla extract or flavorings because they’re higher quality. If the ingredients don’t specifically say vanilla bean, you might be eating chemicals that were created to replicate the taste of vanilla. Yes, the world is a weird place.
- Lemon Juice: You can replace the 2 tablespoons (30g) lemon juice in this recipe with the same amount of apple cider vinegar, white vinegar, or lime juice. You just need some sort of acid to interact with the alkalinity of the baking soda to make the cake rise.
Video
Here’s a video of me making and decorating this anniversary cake.
Comments or Questions?
If you make this anniversary cake recipe, I would love it if you’d snap a pic, post to instagram, and tag me @vegandollhouse. It seriously makes my day/week/month!
Please message me (instagram or email) if you have any questions or feedback about the recipe.
Similar Recipes
If you haven’t made many cakes in your life and want to try something easier, I recommend a round cake. This recipe can be used with round cake pans instead of heart cake pans.
If you feel comfortable with your cake skills, and you want a less traditional anniversary cake, you could make a galaxy cake. Then the message on top can say I Love You To The Moon and Back or You’re Out of This World!
If your anniversary partner doesn’t like chocolate cake, you could make them a funfetti cake. Instead of decorating it to look like a bunny, you could use the method I did for my friend’s birthday cake.
☆☆☆☆☆☆☆☆☆☆
This post links to items I mention. If you click on one, you will go to a website (like Amazon) where you can buy the product. Sometimes, the store you purchase from (Amazon, Etsy, etc.) will pay me for referring you. This costs you nothing extra, and I would never recommend a product that I don’t use. These affiliate programs help me buy ingredients to create recipes for you. Read more about this in my privacy policy.
I mostly cook with organic ingredients, but only specify organic when it’s necessary to ensure the item is vegan.
☆☆☆☆☆☆☆☆☆☆


Rating:⭐⭐⭐⭐⭐
spartasmomma -⭐⭐⭐⭐⭐ Fluffy Technician -⭐⭐⭐⭐⭐ Hoa-lan -⭐⭐⭐⭐⭐ Karthik -⭐⭐⭐⭐⭐ Kimmy -⭐⭐⭐⭐⭐ Mlietz -⭐⭐⭐⭐⭐ ghsted -⭐⭐⭐⭐⭐ ledvenport -⭐⭐⭐⭐⭐