Graduation Cake Design
published on
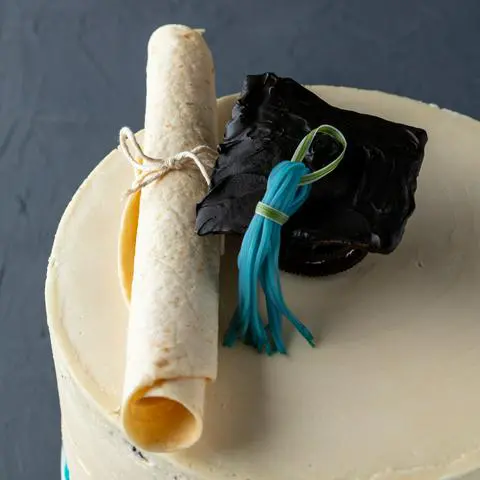
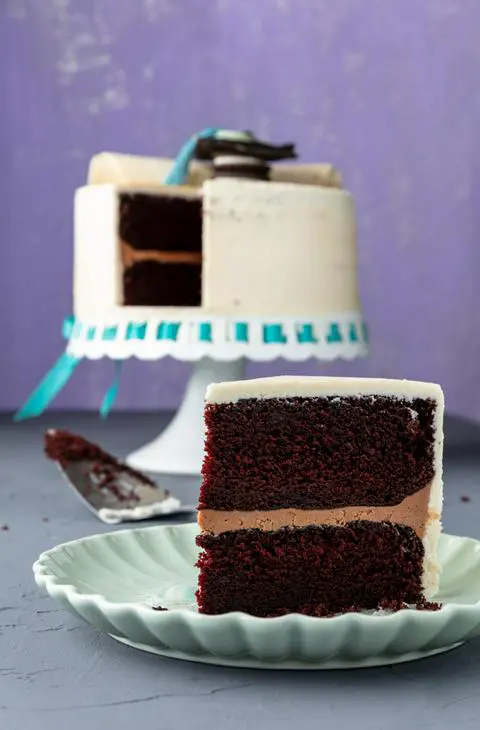
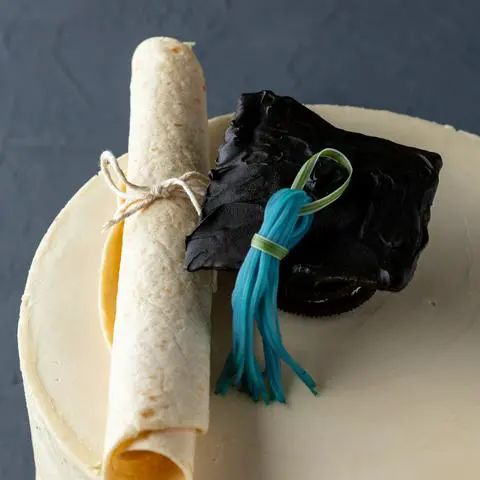
This vegan cake has 2 layers of chocolate cake divided with a layer of chocolate buttercream frosting and is decorated with vanilla buttercream frosting. The recipe and video give detailed instructions on how to make the cake toppers: an edible diploma and graduation hat with tassel. Celebrate any graduation in a special way with this one-of-a-kind cake design.
This recipe makes a 2-layer vegan chocolate graduation cake (12-16 slices).
Table of Contents
(click the links below to skip to the section you’re looking for)
- Vegan Cake Recipe
- Vegan Frosting Recipe
- Cake Decoration
- Tips and FAQ
- Equipment Needed
- Ingredient Substitutions
- Video
♫ Listening to ♫
Chaise Longue by Wet Leg
I would set aside an entire day for you to make this cake, if you’re able to. Since the cake itself only takes 3 hours of active time, a lot of the day will be downtime (waiting for the cake to bake and cool, waiting for the frosting to set, etc.), but you don’t want to rush perfection. Yes, I did refer to this graduation cake design as perfection, which is a bit of a stretch, but at least it’s unique, haha.
This is a perfect cake for a graduation party. If chocolate cake isn’t the graduate’s favorite, use one of my other cake recipes and then follow these instructions for how to decorate it.
Ingredients for a Chocolate Graduation Cake
Dollhouse Shortcut
Clear off a shelf in your fridge and in your freezer before starting on this cake. Chilling in between steps will save a lot of time.
- 2 cups (480ml/g) nondairy milk
- 1 tablespoon (14g) apple cider vinegar
- 3 cups (390g) all-purpose flour
- 2 teaspoons (16g) baking soda
- ½ teaspoon (2-3g) salt
- 2 cups (390g) raw, vegan, or organic sugar
- ½ cup (45g) cocoa powder
- ⅔ cup (144g/160ml) safflower or sunflower oil
- 2 teaspoons (8g) vanilla extract
How to Make a Graduation Cake
(prep time: 22min | bake time: 35min)
Preheat the oven to 350°F (175º C).
Oil two 8" or 9” round cake pans with whatever oil you’re using in your vegan cake recipe. I usually use sunflower or safflower oil because they’re both made for high heat.
Cut circles out of parchment paper that are the exact size and shape of your cake pans and set them in the bottoms of the cake pans. If you don’t have parchment paper, you can skip this step. The purpose of the parchment paper is just to help the cakes come out of the cake pans easier.
Combine 2 cups (480ml/450g) nondairy milk with 1 tablespoon (14g) apple cider vinegar and set aside to let it turn into vegan buttermilk. If you use soymilk, I recommend buying organic or non-GMO. The whole foods store brand (365) is very affordable. If you have a grocery outlet near where you live, that is also a good place to find vegan milk for cheap.
Measure or weigh the dry ingredients into a separate bowl: 3 cups (390g) flour, 2 teaspoons (16g) baking soda, ½ teaspoon (2-3g) salt, 2 cups (390g) sugar, and ½ cup (45g) cocoa powder and whisk it all together. If the nondairy milk I use is sweetened, I reduce the sugar measurement by 2 tablespoons.
Add 2 teaspoons (8g) vanilla extract and ⅔ cup (144g/160ml) oil to the vegan buttermilk you made.
Before you combine the wet and dry, make sure your oven is preheated to 350º. If it isn’t, do some kitchen cleanup while you wait. Once your oven is the right temp, proceed.
Mix the wet ingredients into the dry ingredients and mix them only until you can’t see any flour and until all the large lumps are gone, but don’t keep mixing beyond that point. If you’re using a stand mixer for this step, use the lowest speed and only mix for 15 seconds, stop and scrape the sides with a baking spatula and mix for another 15 seconds, at the most.
Lick the beater while your dog stares at you. This step is optional, but the batter is DELICIOUS so it would be a waste to just rinse it down the drain. You can also lick your stirring utensil with nobody watching, but it somehow tastes better when someone else is coveting it.
Pour the chocolate cake batter into the 9” or 9" round cake pans dividing the batter as evenly as possible in each pan. Use a silicone spatula to get as much batter as you can out of the bowl.
Bake the vegan chocolate cakes on the same rack on the oven (the one that’s most in the middle of the oven) for 34-38 minutes, depending on your oven. The cakes are done when a toothpick inserted in the center of each comes out clean.
Remove the cakes from the oven and set them on cooling racks. After a few minutes, I often flip the cake pans upside down on the cooling rack, so that as they cool, the cakes will naturally fall out of the pans onto the cooling rack.
Cool the cakes completely for 2-3 hours, until when you touch them, they no longer feel warm. If you don’t have that kind of time, stick them in the freezer and they’ll cool much faster.
Remove cooled cakes from pans (if they haven’t fallen out on their own) by shimmying a silicone spatula around the edges of the cake pans.
Wrap each vegan chocolate cake in cling wrap and leave them in the fridge or freezer if you’re baking these cakes in advance of when you plan to assemble and decorate the cake. If they’ll be in the freezer for more than a couple of days, place the cakes into a ziplock freezer bag after wrapping them in plastic wrap.
Vegan Frosting Ingredients
Dollhouse Shortcut
Use room temperature ingredients for the best frosting results. I usually take the frosting ingredients out of the fridge before I start making my cakes, so I don’t forget.
- 2 teaspoons (8g) vanilla extract
- 1 cup (176g) vegan butter or margarine
- ¾ cup (144g) organic palm shortening
- 4 ½ cups (540g) organic powdered sugar
- 2-4 teaspoons (10-20g) nondairy milk, room temp (I used soymilk)
- ¼ cup (18g) cocoa powder
How to Make Vegan Frosting
(prep time: 30min)
Whisk 2 teaspoons (8g) vanilla, 1 cup (176g) vegan butter or margarine, and ¾ cup (144g) shortening until it’s light and fluffy, using a stand mixer (or a handheld electric mixer) and set to medium speed. It might be possible to do this by hand if you have a lot of upper body strength and time, but I don’t recommend it, unless you really have no other choice or unless you’re training for the olympics. With an electric mixer, this step takes 3-5 minutes. By hand, it could take 20 minutes.
Stop the mixer after a couple minutes and use a silicone spatula to scrape the sides and bottom of the mixer bowl. Mix again.
Sift in 4 ½ cups (540g) organic powdered sugar, a cup at a time, mixing thoroughly and scraping the bowl with the silicone spatula between each added cup.
Add 2-4 teaspoons (10-20g) of (room temperature, if possible) nondairy milk, little by little, mixing in between each addition, until the frosting is a creamy and spreadable consistency.
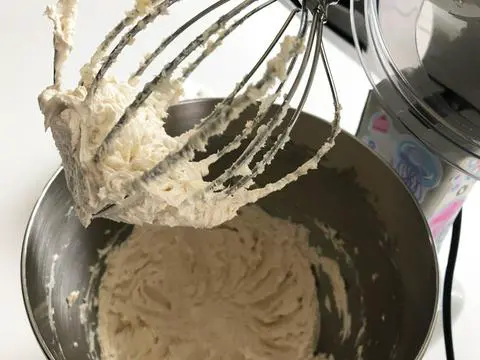
Transfer ¾ of the frosting to another bowl.
Sift ¼ cup (18g) cocoa powder into the remaining frosting and mix again to make your chocolate buttercream. You may need to add up to a teaspoon of nondairy milk to get it back to the right consistency.
Cover the rest of the vanilla frosting for right now.
Ingredients needed for the Graduation Cake Decorations
Dollhouse Shortcut
You can purchase a cake topper to save time on decorating. See the section on graduation cake toppers below for ideas.
- 1 flour tortilla
- 2 Oreo cookies, Newman O’s, or any brand of vegan sandwich cookie you like
- 1 square vegan graham cracker (or sub a saltine cracker or an extra flour tortilla)
- 3 skittles or unreal dark chocolate quinoa gems
- chives or society garlic leaves (optional, see instructions below)
- 1 cup vegan chocolate chips
- 1 ounce angel hair pasta
- vegan food coloring (optional)
How to Make the Decorations for the Graduation Cake
Making an edible diploma for a graduation cake topper
prep time: 1m
Roll up a tortilla and tie it with something: ribbon, dental floss, twine, string, embroidery thread, chive or society garlic leaves, depending on what kind of design you’re going for.
Making an edible graduation hat for cake or cupcake toppers
prep time: 20m | cook time: 25m
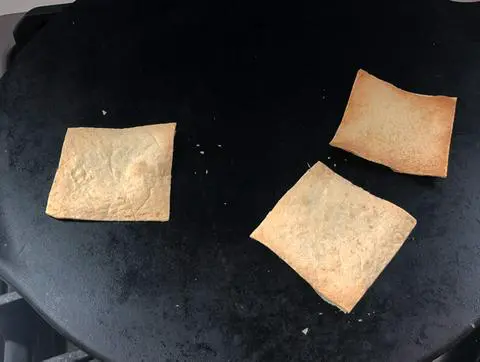
Ideally, you’ll have vegan graham crackers or saltine crackers on hand, and you won’t have to make your own cracker out of a tortilla like I did. However, if you discover that you’re unprepared like I was, then I’ll tell you what I did. I cut 3 squares out of a flour tortilla. (I cut one square and then used that as a template for the other 2 squares.) You are only going to use one of these for the cake, so you don’t really need 3, but I always make a few so I can choose the best one. I baked the tortilla squares for around 10 minutes at 325º. I opened the oven and used the back of a metal cooking spatula to flatten them out. You can see in the video that they tried to get all wavy, so I did my best to flatten them. Then I baked them for another 5 minutes before removing them from the oven.
Melt around a cup of vegan chocolate chips using a double boiler (or you can use the microwave at 30-second intervals, stirring in between each).
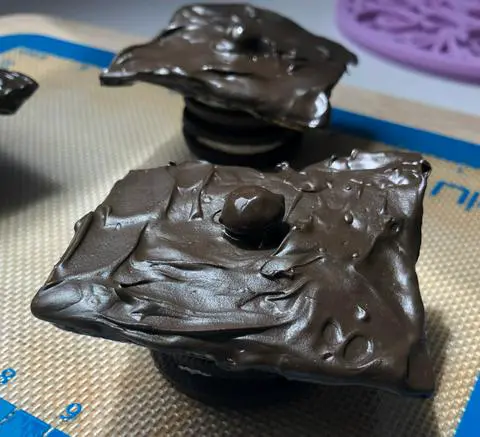
Glue 2 Newman O’s or Oreos together, using the melted chocolate as the glue. This will be the base of the hat. I made 3 hats so I could choose the best one for my cake, so I repeated this 2 more times. If you’re super meticulous or are designing this cake for a commission, dip the 2-cookie stack completely in chocolate so you can’t tell that it’s cookies when you look at it.
Add black vegan food coloring to the chocolate. It doesn’t need to be completely black at this point because black food coloring gets darker with time.
Cover the crackers completely in melted chocolate.
Set the cracker on the stack of 2 cookies.
Dip your button shaped candy in the melted vegan chocolate chips using your fingers to hold it. I used skittles, but if you’re a stricter vegan who doesn’t eat skittles because you’re unsure of the source of the sugar, then use unreal dark chocolate quinoa gems.
Remove excess chocolate and set the chocolate covered candy on top of the hat in the middle. It took me about 15 minutes to make 3 hats.
Freeze the graduation hats while you make the tassels.
Boil a small pot of water with vegan food coloring added to the water. My water took about 15 minutes to start boiling before I could add the pasta.
For my color, I added Wilton blue gel color. You can use whatever color matches your graduate’s school colors or the color of their actual tassel if you know that. The boy who was graduating high school that I made my cake for was an underprivileged youth through the Cake 4 Kids program I volunteer for. Since I knew nothing about him, I chose blue since that was my graduation color (how I even remember that, but can’t remember the ages of my own children bewilders me).
Break 1-2 ounces of angel hair pasta in half directly in the middle if you can. I break mine over the garbage can because there are always some little flying pasta crumbs that will try to make a mess of your kitchen.
Add the pasta to the pot as soon as the water starts to boil.
Cook the pasta according to the package instructions. I cooked mine for about 5 minutes.
Strain the pasta in a colander in the sink.
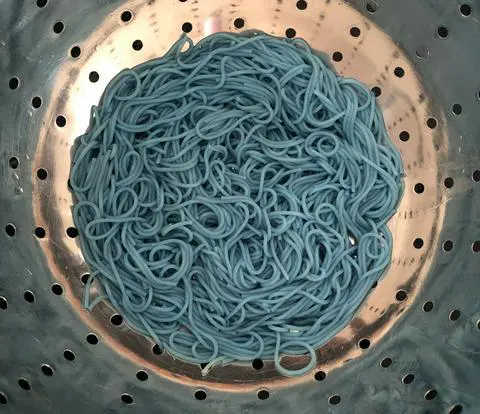
Rinse with cold water to stop the cooking process.
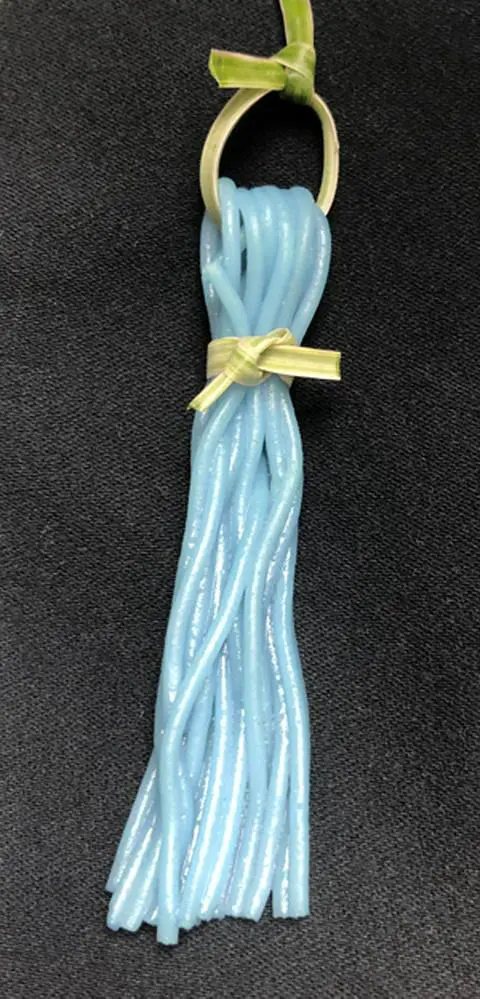
Grab around 10 pieces of pasta and try to line them all up. Wrap them around a straw or a chopstick.
Tie the pasta, just below the straw or chopstick, but don’t tighten the tie too much or the pasta will break. You want to tie it loosely. You can use anything to tie this: dental floss, ribbon, twine, string, embroidery thread, etc. I made my cake for an organization I volunteer with that requires everything on the cake to be edible, so I used some society garlic leaves to tie mine (they’re similar to chives, but easier to forage in my neighborhood). I made 3 tassels and then used my favorite one on the cake, but if you’re not a perfectionist, you can just make one. They take about 5 minutes for each one.
Assembling the Graduation Cake
(assembling the cake: 10min | frosting the cake: 15-45min | decorating the cake: 5min)
Level your cakes if they aren’t flat on top. Do this by using a long bread knife and slicing any parts off the top that are keeping the top of the cake from being flat. If you make this cake from a box mix, you’ll likely have to do this, but if you use my cake recipe, you probably won’t need to.
Dollop a small dot of frosting onto the center of a cake board and set the first cake on top of it, centering it in the center of the cake board.
Cover the bottom layer of cake in chocolate frosting. This is easiest by using an offset spatula and a cake turntable if you have one. Start at the center and work your way out to the outer edge. If you don’t have a cake decorating turntable you can just turn the cake stand or cake board by hand (see the video below to see that I did that).
Set the second cake on top, trying to line it up perfectly with the bottom layer.
Cover the cake with vanilla frosting, on the top and side of the cake, using an offset spatula and a cake decorating turntable (if you have one). Add extra frosting where needed to fill in any gaps between the 2 cake layers or between the cake and the cake board or cake stand. This only needs to be a thin layer of frosting because it’s just your crumb coat, so if you can see some of the color from the chocolate cake showing through the white frosting, that’s ok. You’re going to cover it up with your final frosting.
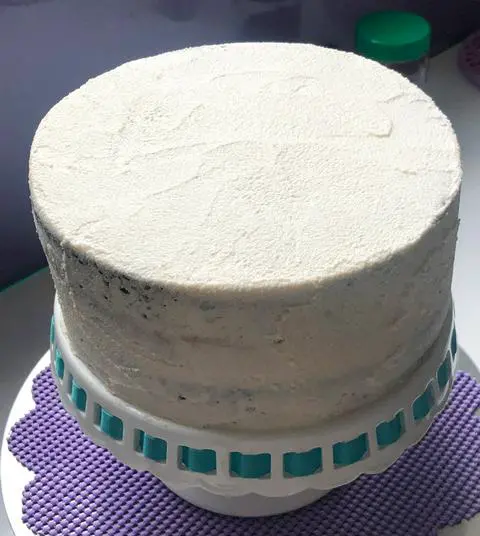
Carefully move your cake to the fridge or freezer to allow the crumb coat to firm up for at least 15-20 minutes. We do this to keep cake crumbs out of our final product.
Color the vanilla frosting if your graduate has certain graduation colors. Use vegan food coloring and add just a drop, mix, and add another drop and mix. You can’t make it lighter if you go too dark, so take your time. I left mine white, so I skipped this step.
Remove the chocolate cake with the crumb coat of frosting from the fridge or freezer. Cover the cake in a final coat of frosting, using an offset spatula or a bench scraper while spinning your cake decorating turntable to smooth out the frosting as much as possible. I sometimes heat up my offset spatula by dipping into a jar of hot water and then drying it off with a towel before smoothing out the cake. Depending on how picky you are, you could spend up to 30 minutes just trying to get your frosting perfectly smooth, so this is completely up to your timeline and level of nitpickiness. (It’s a word! Stop trying to change it, autocorrect!)
If you plan to write Congratulations or draw any other design elements on top, you want to do that now before you add the decorations.
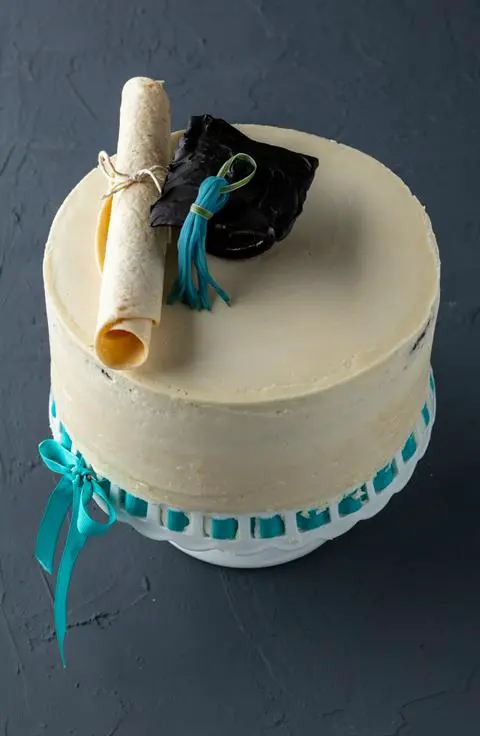
Set the tortilla diploma on your cake.
Set the graduation hat on your cake.
Add the tassel to your graduation hat.
Give you and your cake a round of applause for this huge achievement. You have officially earned your degree in decorating a cake with random stuff from around the house.
Video showing how I made this vegan graduation cake
Comments or Questions?
If you make this graduation cake, I would love it if you’d snap a pic, post to instagram, and tag me @vegandollhouse. It seriously makes my day/week/month!
Please message me (instagram or email) if you have any questions or feedback about the recipe.
Questions and Answers and Tips
Can I use a box cake mix in place of your cake batter?
You can veganize a box of chocolate cake mix (as long as you buy a vegan one) by ignoring the instructions on the back of the box. Instead use the instructions below (these instructions are for a cake mix that weighs 432g). This is a modified version of Gretchen’s Bakery’s recipe, and it’s delicious and a perfect consistency. If you try to make a box mix and only replace the eggs with egg replacer, it will be a hot mess (ask my garbage can full of cake). Mix the following ingredients together in a bowl before transferring to your prepared cake pans (my instructions for my chocolate cake recipe above tell you how to prepare your cake pans), and then do your first toothpick test after only 30 minutes.
- 1 box (432g) of cake mix
- 1 cup (130g) flour
- ¾ cup (150g) sugar
- ¼ cup (22g) cocoa powder
- 2 tablespoons (24g) powdered egg replacer (I use ener-g)
- ½ teaspoon (2-3g) baking powder
- ⅓ cup (72g/80ml) oil
- 1 cup (240g/ml) water
- ¾ cup (180g/ml) non-dairy milk
Can I make this graduation cake gluten free?
Yes! Just use a gluten-free flour blend in place of the all-purpose flour, and replace the cookies, crackers, and tortillas with gluten free versions.
Can I make the frosting with less sugar?
Sure. Replace the 6 cups of powdered sugar with 5 cups of powdered sugar, and omit the nondairy milk so it stays thick enough to pipe.
Can I make this graduation cake recipe into cupcakes?
Sure! This recipe will make around 24 cupcakes. Fill the cupcake papers ⅔ of the way full, and bake them for 18 minutes. When you get to the design and decorations, you can make half of the cupcake toppers the graduation hats and tassels and the other half of the toppers can be mini versions of the diplomas (just cut 2 tortillas into 6 triangles each like you’re cutting a pie or cake and then start at the point when you roll them).
Layered cakes give me anxiety. Can I make this as a one-layer graduation sheet cake?
This graduation cake recipe can be baked as a sheet cake instead of round layered cake. Just pour the batter into an oiled oven safe rectangle pan. If the toothpick test doesn’t come out dry after the initial baking time, bake it for 5 additional minutes. Then place your cake toppers whereever you like. If you do this, you can probably make a smaller batch of the frosting recipe.
Can I use 6-inch cake pans if they’re all I have?
You sure can! Divide the batter into three 6" round cake pans instead of dividing the batter equally into two 9” or 9" round cake pans and set your timer for 30 minutes for your first toothpick test.
How do I store this graduation cake?
I usually make my cakes in advance since they often take a whole day to make and decorate. Here’s a little cheat sheet for cakes that are fully covered in buttercream frosting but haven’t yet had the cake toppers added.
- 1 day in advance: you can store the (uncut) cake in the fridge uncovered, because the frosting acts as a barrier to protect the cake from drying out
- up to 1 week in advance: you can store the (uncut) cake in the fridge uncovered or in a cake carrier
- up to 3 months in advance: freeze the (uncut) cake uncovered until it hardens to the touch and then wrap it completely in cling wrap to keep it from drying out or taking on any weird freezer smells. Move it from the freezer to the fridge a day before you want to serve it, but don’t remove the cling wrap until 15 minutes before you’re ready to serve it.
- leftover cake: I store my cut cake in a cake dome on the counter for up to a week. You can also keep it in any tupperware that is large enough to fit it, either on the counter or in the fridge for up to 1 week. If you don’t plan to eat the leftover cake within a week, you can cut it into individual slices and wrap those slices in cling wrap before placing them in a freezer ziplock bag and storing them in the freezer for up to 3 months.
Personalized Graduation Cake Toppers You Can Buy
If the idea of spending your time designing and making a graduation cap out of crackers, chocolate, candy, cookies, and pasta doesn’t excite you, then maybe purchasing one of these cake toppers from etsy might be more up your alley. I chose these 3 from hundreds based on 2 factors: the design options and vegan materials used. Just don’t let your graduate try to eat it!
Equipment Needed for Graduation Cakes
- Cake Pans: My favorite kind of cake pans are aluminized steel cake pans. They’re so non-stick that the cakes fall right out of them once they’re cooled a bit. You can make this recipe using other types of pans, but these are what I use.
- Stand Mixer: The only step you need a stand mixer for is the frosting. If you don’t have a stand mixer, any handheld electric mixer should work.
- All other equipment I use in this recipe is optional, and you can make do without it. The items I link to in this recipe do make the process easier though.
Substitutions
- Vegan Shortening: If you don’t have access to Spectrum sustainable organic palm shortening you can add another cup of vegan butter or margarine, making a total of 2 cups (450g).
- Vegan Butter: My favorite is the organic whipped Earth Balance, but if you avoid soy, you can buy the soy-free Earth Balance. If you do this, your frosting will be less stable at room temperature, so only make this substitution if you have the ability to keep the graduation cake in the fridge instead of on the counter.
- Plant Milk: If you don’t have 2 cups (480ml) of nondairy milk, you can substitute any amount with water, coffee, nondairy creamer, or coconut water. You can also mix and match different nondairy milks. I do this a lot when my macadamia milk only has a little bit left at the bottom and I use it up, and then I open a new container of almond or soymilk. You can even use chocolate oat milk! I’ve done that before.
- Apple Cider Vinegar: You can substitute the apple cider vinegar with white distilled vinegar. You just need some sort of acid to interact with the alkaline baking soda to make the cake rise. You can even substitute lemon juice!
- Oil: I recommend using safflower, sunflower, avocado, or coconut oil for baking cakes because those oils are made for high heat, which helps you avoid transfats. However, you can use any other oil such as vegetable oil, canola oil, grapeseed oil, etc. People even make cakes with olive oil, but I don’t recommend it.
If you like this cake design and decoration, you might also like my oreo cake, my ding dong cake, and my marble cake.
This post contains affiliate links. If you click on one and purchase an item, it will cost you no additional money, but I will receive a small commission. These small amounts help pay for ingredients for these recipes. Read more about this in my privacy policy.
☆☆☆☆☆☆☆☆☆☆
This post links to items I mention. If you click on one, you will go to a website (like Amazon) where you can buy the product. Sometimes, the store you purchase from (Amazon, Etsy, etc.) will pay me for referring you. This costs you nothing extra, and I would never recommend a product that I don’t use. These affiliate programs help me buy ingredients to create recipes for you. Read more about this in my privacy policy.
I mostly cook with organic ingredients, but only specify organic when it’s necessary to ensure the item is vegan.
☆☆☆☆☆☆☆☆☆☆


![ONE MORE [25pcs] 10" White Cakeboard Round,Disposable Cake Circle Base Boards Cake Cardboard Pizza Plate platter 10 inch,Pack of 25](https://m.media-amazon.com/images/I/41JwU6EVGIL._SL500_.jpg)


Rating:⭐⭐⭐⭐⭐
Vegan Radiation -⭐⭐⭐⭐⭐