Vanilla Blueberry Cake
published on
Craving a moist vanilla blueberry cake? This foolproof recipe achieves the perfect balance of sweet and tart using frozen blueberries.
This recipe makes a large 2-layer heart cake (20 servings).
Table of Contents
(click the links below to skip to the section you’re looking for)
- Vegan Cake Recipe
- Blueberry Filling Recipe
- Vegan Frosting Recipe
- Vintage Cake Decoration
- FAQ
- Ingredient Substitutions
- Video
- Contact Me with Questions
- Similar Recipes
♫ Listening to ♫
Glow by Mr. Kitty
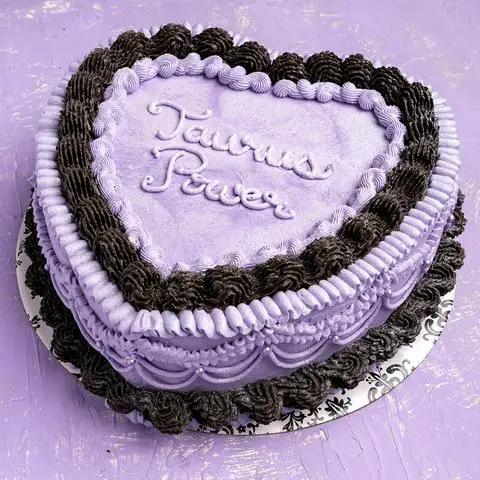
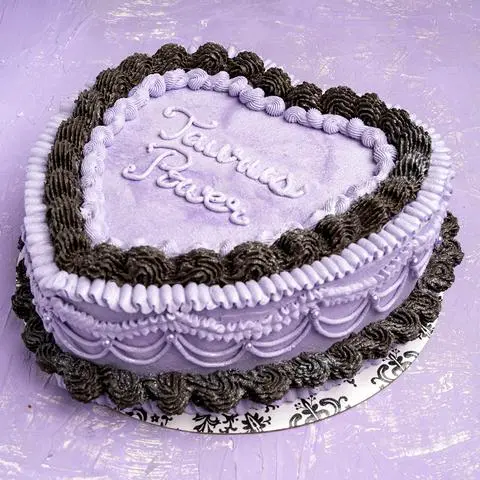
My friend Jessica (@folvey) requested this cake for her birthday. I knew she wanted it to be heart-shaped. And I knew she wanted the vintage lambeth cake decor. So, we started talking about flavors and colors. Her first two flavor choices were lavender and matcha. I don’t like either of these flavors. I do understand that it’s not my birthday, but I’m self-centered haha. I mean, I am, but the real reason I didn’t want to make those is because I want to be excited about the cakes I make. And I just can’t get excited about a cake flavor that belongs in a bath bomb. Or a cake flavor that tastes like my least favorite tea (and I LOVE tea). Luckily, her third choice was blueberry.
Her inspiration pictures featured 6-inch three-layer heart cakes, decorated with lambeth piping, and adorned with ribbon bows. I forgot to add ribbons to this cake, but when you make yours, that’s always an option. I still had large heart cake pans from when I made a casual vegan wedding cake for Kimmy, so I used those for this cake.
Ingredients you need for Vegan Vanilla Cake
(jump to the substitutions section to see ingredient details and suggestions for substitutions)
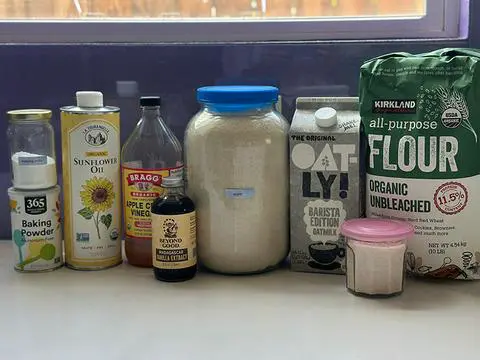
- 1 ¾ cups (415ml/415g) nondairy milk
- ¼ cup (60g) apple cider vinegar
- 1 ⅓ cups (300g) organic or vegan sugar
- ⅔ cup (135g) sunflower oil
- 1 tablespoon (12g) vanilla extract
- 3 ½ cups (455g) flour
- 1 ½ teaspoon (9-10g) baking soda
- ½ teaspoon (2-3g) baking powder
- 3 pinches of salt (optional)
How to make Vanilla Cake
prep time: 24 min | bake time: 27 min
Dollhouse Shortcut
Bake the cake up to 3 days ahead of time and store it in the fridge covered in cling wrap until you’re ready to assemble and decorate it.
Preheat the oven. Set your oven to 350ºF (175ºC). Make sure you have an oven rack as much in the middle of the oven as possible. Sometimes I wait to turn on the oven until after I prep my cake pans since prepping the cake pans takes 8 minutes.
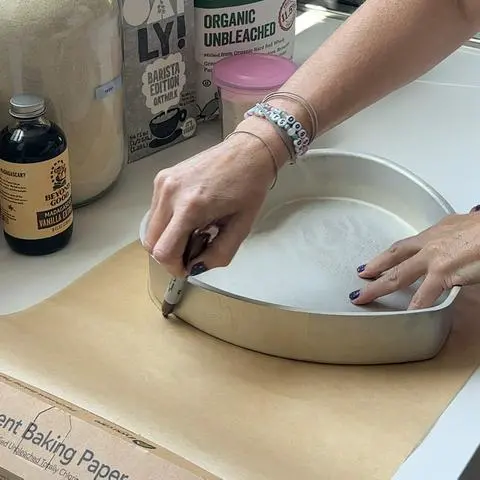
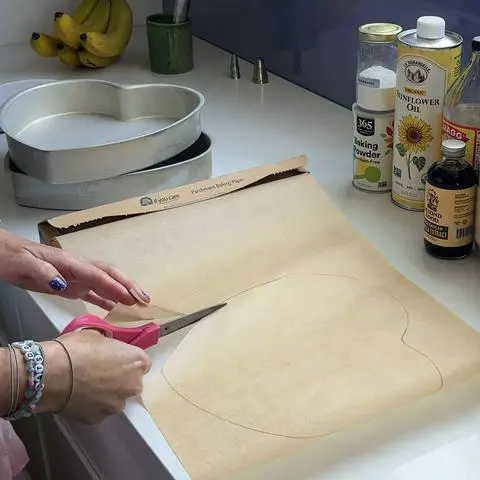
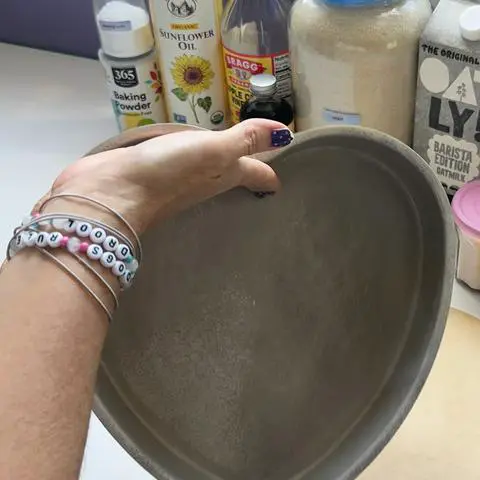
Prepare your cake pans. Coat the bottoms and sides of the heart cake pans with oil. Cut 2 pieces of parchment paper that are the size and shape of your pans. The easiest way to do this is to trace a cake pan onto parchment paper with a pen and then cut a few mm inside of the line you drew. Set the parchment paper hearts in the bottom of your heart pans, and smooth them out with your hands.
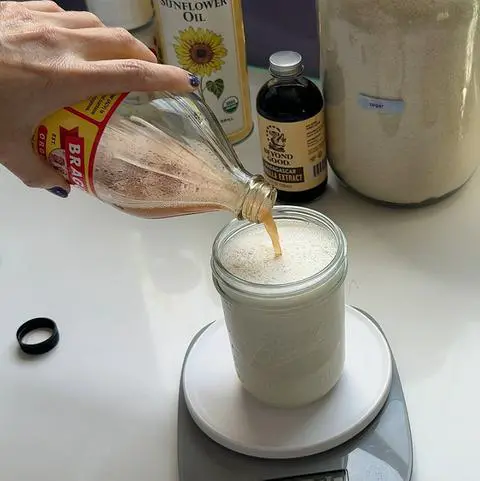
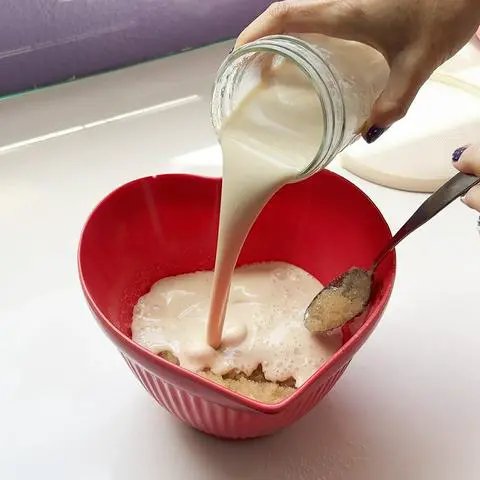
Make vegan buttermilk. Mix 1 ¾ cups (415ml/415g) nondairy milk with 4 tablespoons (60g) apple cider vinegar to make vegan buttermilk. Set it aside while you sift and whisk your dry ingredients.
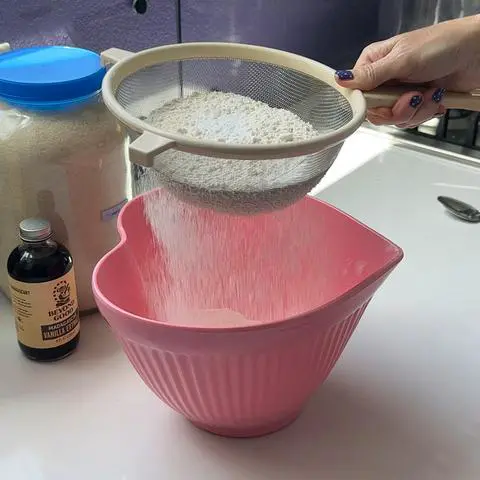
Combine dry ingredients. Sift the dry ingredients together into a large mixing bowl. This includes 3 ½ cups (455g) flour, 1 ½ teaspoon (9-10g) baking soda, ½ teaspoon (2-3g) baking powder, and 3 pinches of optional salt. Whisk it all together.
Combine wet ingredients. Sift 1 ⅓ cups (300g) vegan sugar into a separate mixing bowl. Vegan sugar is moist, so it gets lumps in it more easily than processed sugar. You can skip sifting if you’re using an electric mixer. Add ⅔ cup (135g) sunflower oil and 1 tablespoon (12g) vanilla extract to the bowl with the sugar. Add the vegan buttermilk you made earlier. Mix the wet ingredients together. Check that the oven is preheated before the next step.
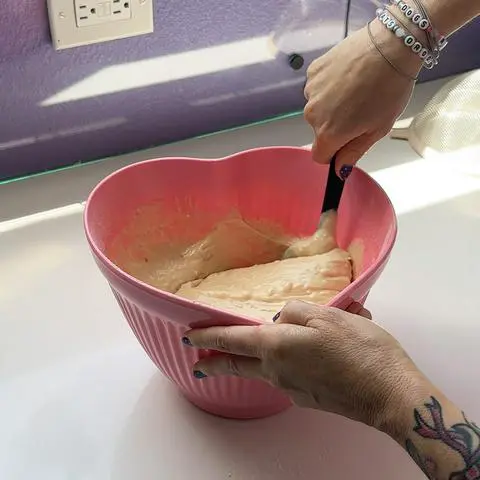
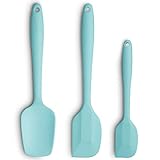
Combine the wet and dry ingredients. Add the dry ingredients to the wet ingredients. Use a silicone spatula or large spoon to mix it until you no longer see any flour. I use a baking spatula because it allows me to scrape the sides and the bottom of the bowl. Those sneaky dry ingredients like to hide.
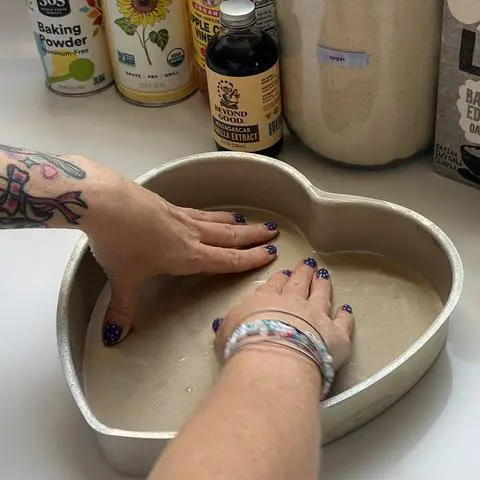
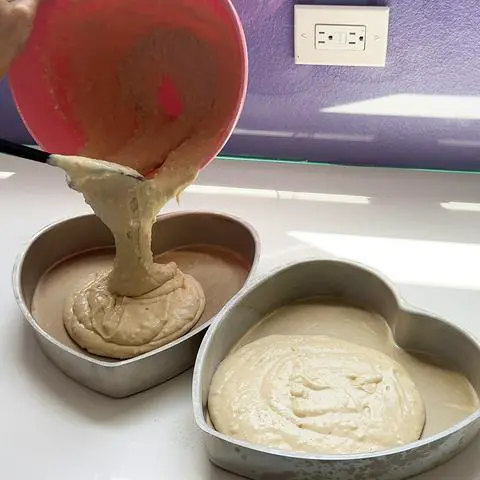
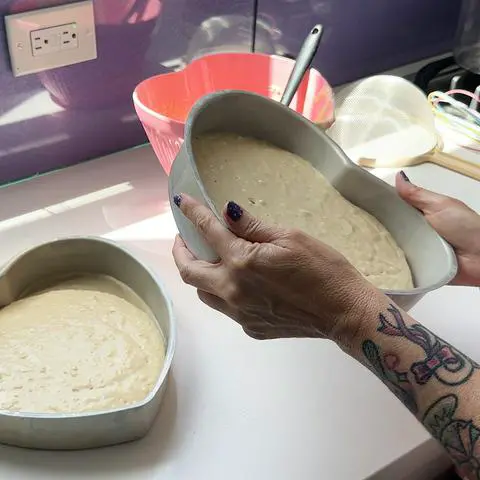
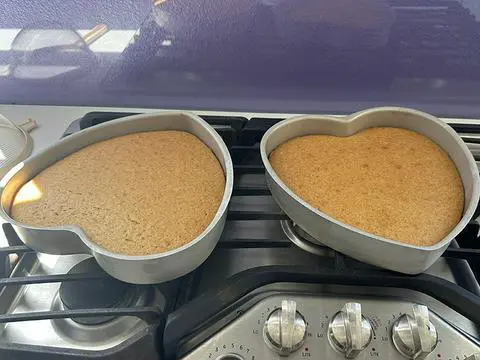
Fill the cake pans. Pour batter into the two cake pans, trying to put an even amount into each one. Use a baking spatula to get every last bit out of the bowl. Tilt the cake pans to make sure the batter spreads evenly.
Bake the cakes. Set the pans on the centermost rack in the oven (the rack that’s most in the middle) for a more even bake. Bake at 350ºF (175ºC) in a preheated oven for 27-32 minutes, or until you can stick a toothpick in a few spots in the center of the cake and it comes out clean. Bake times vary from oven to oven. I baked mine for 27 minutes, but my oven runs hot. If it doesn’t pass the toothpick test after 27 minutes, bake it for 5 more minutes.
Cool the cakes. Remove the cakes from the oven when they both pass the toothpick test. Set the cakes on cooling racks or a wire rack to cool. My stove isn’t above my oven, so I often use my stove as a cooling rack. Don’t try this if your oven is below your stove.
Parchment Paper

Silicone Spatula
Heart Cake Pans

Ingredients you need for Blueberry Cake Filling
(jump to the substitutions section to see ingredient details and suggestions for substitutions)
- 1 pound (450g) fresh or frozen blueberries
- ¼ cup (50g) vegan sugar
- 2 tablespoons (16g) cornstarch
- half of a lemon
- 1 teaspoon (4g) vanilla extract
- ¼ cup (60g) water
How to make Blueberry Filling for the Vanilla and Blueberry Cake
prep time: 10 min | cook time: 13 min
Dollhouse Shortcut
Make the blueberry filling up to 3 days ahead of time and chill it in the fridge in an airtight container.
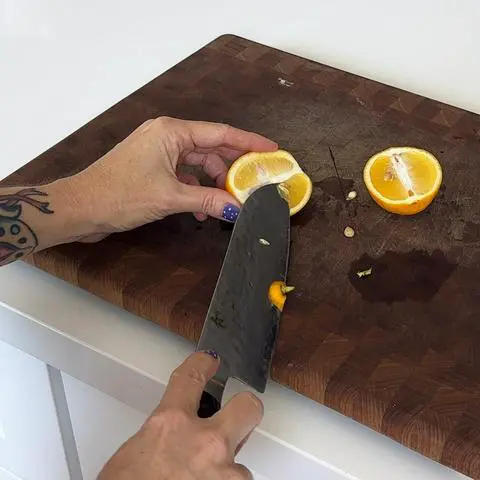
Prepare the lemon. Slice a lemon in half. Remove seeds from half of the lemon. Store the other half in an airtight container in your fridge for later.
Blend the filling ingredients. In a blender, combine 1 pound (450g) frozen blueberries, ¼ cup (50g) vegan sugar, 2 tablespoons (16g) cornstarch, half a lemon (seeded), 1 teaspoon (4g) vanilla extract, and ¼ cup (60g) water. Blend. I have a blendtec blender and I use the sauces or smoothies button, interspersed with the pulse button. If it stops blending, mix it up a little and try again. It’s gonna be like a super thick smoothie.

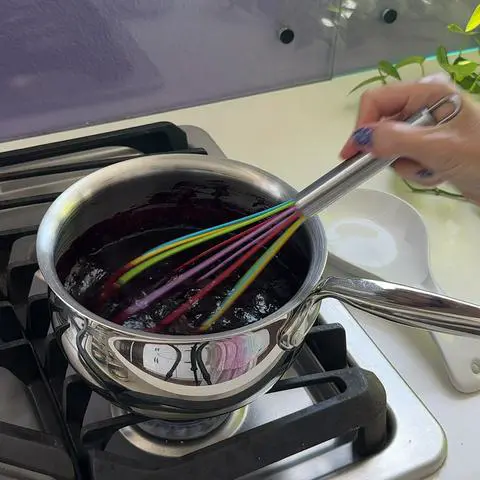
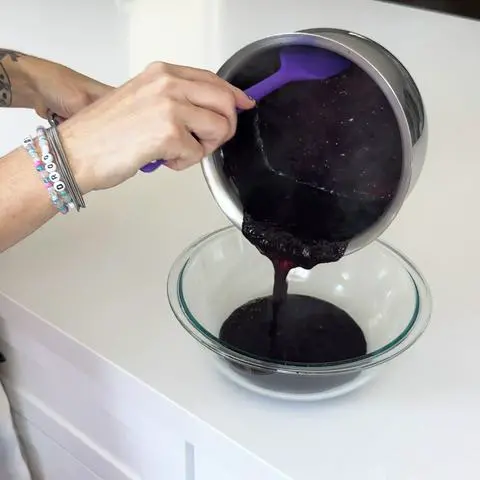
Cook the filling. Place a medium saucepan over medium-low heat. Pour the contents of the blender into the saucepan. Stir frequently as the mixture begins to bubble and thicken. It took 10 minutes to start bubbling on my stove. Once it starts to bubble, cook for 2-3 more minutes, whisking constantly.
Cool the filling. Turn off the stove, and remove the pot from the heat. Let it cool to room temperature. Once cooled to room temperature, transfer the blueberry filling to an airtight container, and store it in the fridge until you’re ready to use it. Don’t forget to lick the whisk. It’s one of my favorite things about baking.
Ingredients for Vegan Vanilla Buttercream Frosting
(jump to the substitutions section to see ingredient details and suggestions for substitutions)
- 1 ¾ cups (310-385g) vegan butter or margarine
- 1 ¾ cups (335g) organic palm shortening
- 1 tablespoon (12g) vanilla extract
- 8 ½ cups (1020g) organic powdered sugar
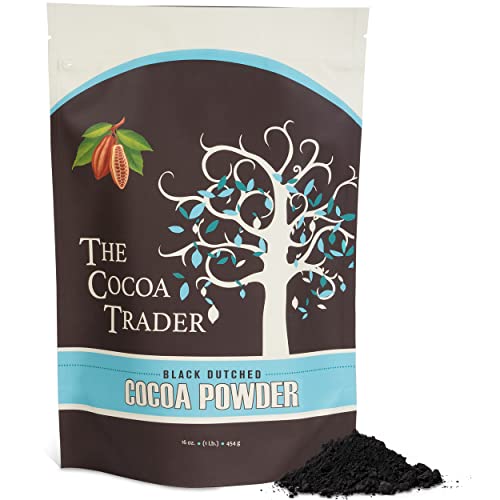
- 2 tablespoons (12g) cocoa powder
- ½ cup (56g) black cocoa powder
- 2-3 teaspoons nondairy milk or creamer, room temp (optional)
How to make Frosting for a Vanilla Blueberry Birthday Cake
prep time: 30 min
Dollhouse Shortcut
If you’re short on time, use 5 containers of Miss Jones organic vanilla frosting instead making your own from scratch.
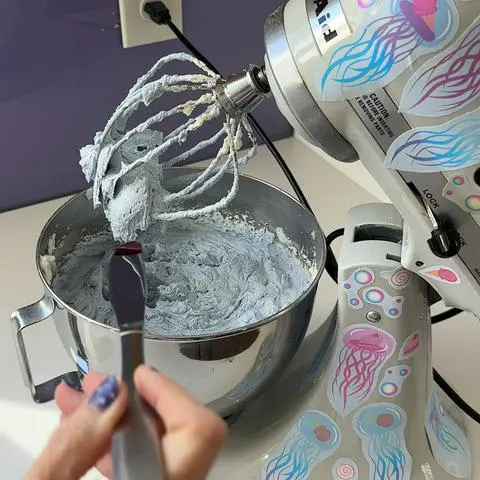
Whisk vegan butter and shortening. Whisk 1 tablespoon (12g) vanilla, 1 ¾ cups (310-385g) vegan butter or margarine, and 1 ¾ cups (335g) Spectrum sustainable organic palm shortening until it’s light and fluffy. Use a stand mixer fitted with the whisk attachment. (If you don’t have a stand mixer, use a handheld electric mixer.) Set the mixer to medium speed. Stop the mixer after a couple minutes, and use a baking spatula to scrape the sides and bottom of the mixer bowl. Mix again. This step takes 3-5 minutes. While it’s mixing, start on the next step.
Sift powdered sugar. Sift 8 ½ cups (1020g) of organic powdered sugar into a bowl. I do this while I’m waiting for my vegan butter and shortening to whip up.
Add powdered sugar. Add the powdered sugar, 1 cup at a time. After each cup you add, mix thoroughly and scrape the bowl with the baking spatula. After you add powdered sugar, start your mixer on low speed and then increase it slowly (unless you want to look like a powdered sugar donut).
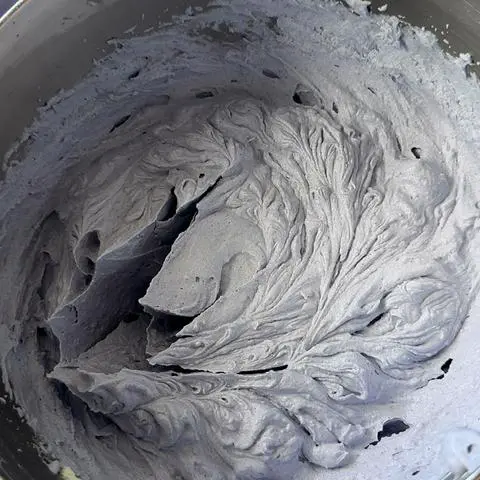
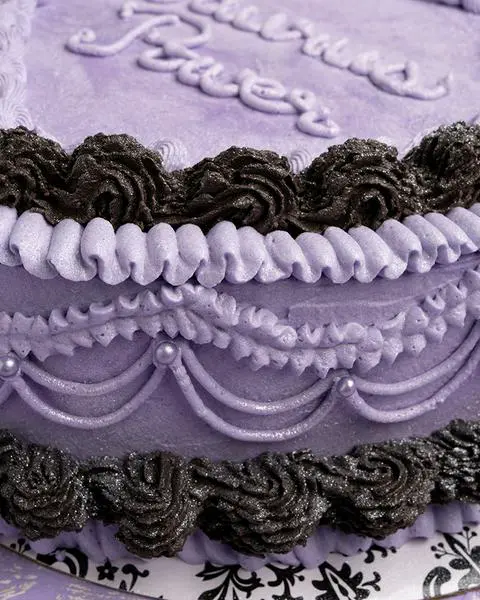
Color the frosting. This step is optional depending how you want to decorate your blueberry vanilla cake. Mine is a birthday cake, so I’m decorating it in the colors the birthday girl chose: lavender (main color) and black (accent color). For lavender, I used wilton violet gel color plus a little bit of Wilton rose gel color. I colored the entire batch lavender, because black can go over lavender. If your accent color isn’t a darker version of the main color, you should separate out about 2 cups of the frosting and leave it white before you color the rest.
Spectrum Sustainable Organic Palm Shortening

Silicone Spatula
Organic Powdered Sugar

How to Assemble a 2-Layer Vegan Vanilla Cake with Blueberry Filling
prep time: 20 min | wait time: 30 min
Dollhouse Shortcut
I like to bake the cake, make the filling, and assemble the cake in one day. And then decorate the cake the next day. This gives me patience and time to decorate without feeling the need to rush.
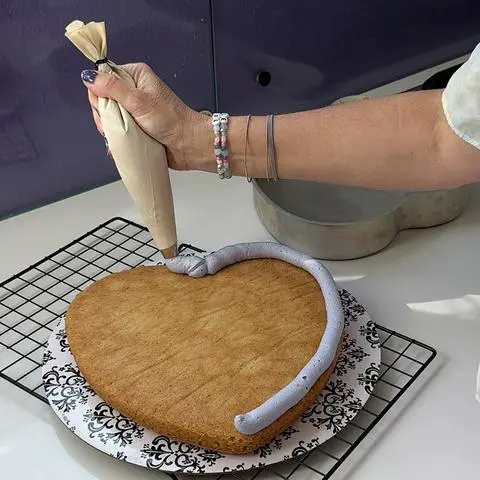
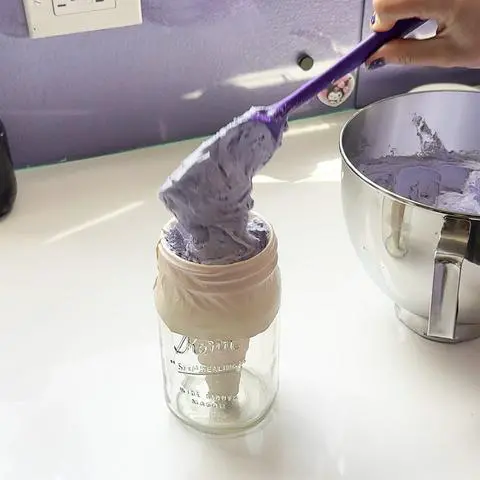
Prepare for assembling. Fit a piping bag with piping tip 1A. If you don’t have that tip, use a piping bag with no tip, as long as the hole is the same size as the tip is. Fill the piping bag with the main color of frosting you made earlier. For my cake, the main color is lavender. If you have a helper, ask them to hold the bag open for you while you fill it. If you don’t have that luxury, I recommend using a vase, glass, jar, or pitcher. Choose a dish that’s tall enough to fit your piping bag. But make sure it has an opening the right size to fold the edges of the piping bag over. This step only takes a minute.
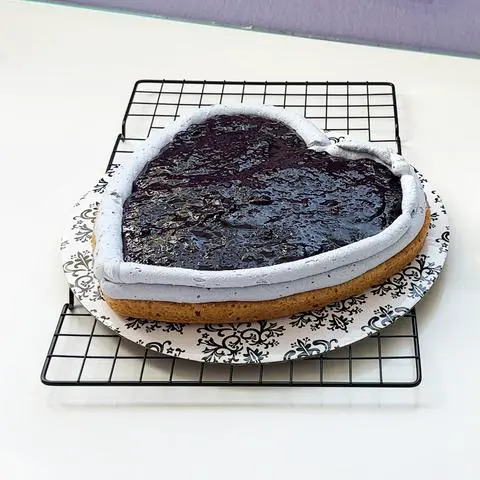
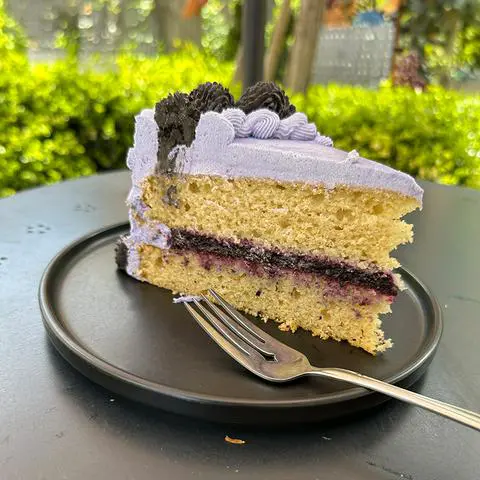
Add the blueberry filling. Set one of the vanilla heart cake layers onto a cake plate, cake stand, or cake board. If the cake doesn’t easily pop out of the cake pan, shimmy a baking spatula around the edges. Pipe a border of frosting around the perimeter of the bottom cake layer. This will serve as a wall to keep the blueberry filling from spilling out of the cake. Mix the blueberry filling, and pour it onto the bottom cake layer. This step takes about 5 minutes. Chill the cake in the fridge for 30 minutes or the freezer for 15 minutes to firm it up before you add the second layer.
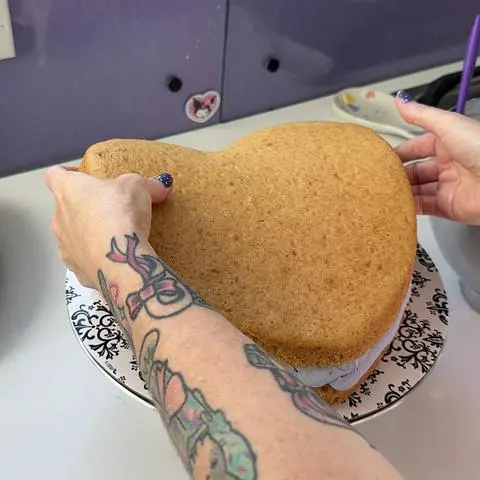
Finish assembling the heart cake. Remove the cake from the fridge or freezer. Set the top layer of vanilla cake on top of the blueberry filling layer, aligning the hearts as closely as possible.
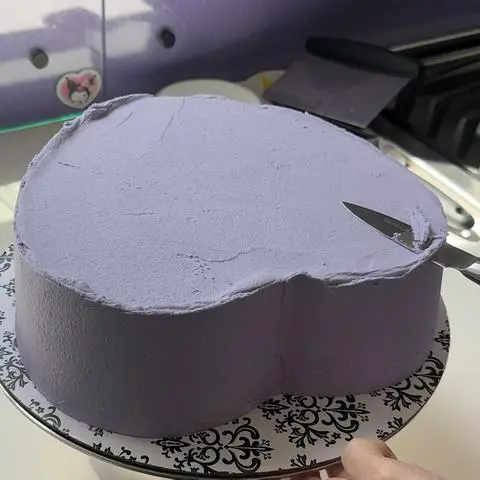
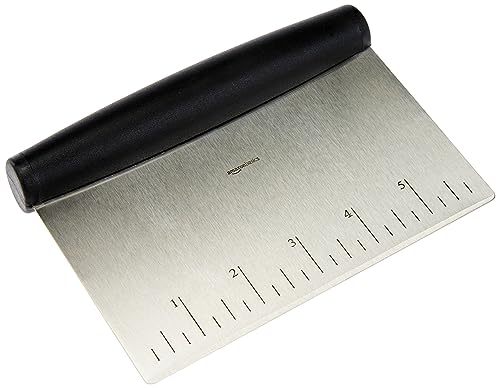
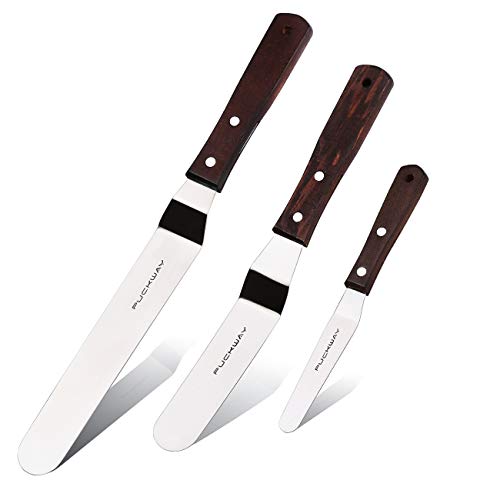
Frost the cake in a crumb coat. Cover the entire cake in a thin layer of frosting, called the crumb coat. If crumbs get in it or if you can see spots of cake through the frosting, it’s ok. You’ll cover the crumb coat with the final coat later. Smooth the top with an offset spatula. Smooth the sides with a bench scraper. Adding the top layer and doing the crumb coat took me 13 minutes. Chill the cake with the crumb coat for at least 15 minutes in the freezer (or 30 minutes in the fridge). If you’re not decorating until the next day, leave the cake uncovered in the fridge overnight. This is what I did.
Piping Bag
Wilton Large Round Tip 1A
Bench Scraper/Chopper

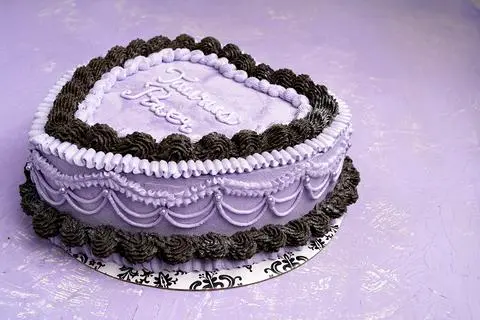
How to Decorate a Vegan Vintage Cake
prep time: 1 hour 30 min | chill time: 1 hour 5 min
Dollhouse Shortcut
Vintage cake decoration does take time, and your frosting will thicken with time. So, you’ll want to rewhip your frosting frequently, thinning it when needed, to avoid air bubbles and string breakage.
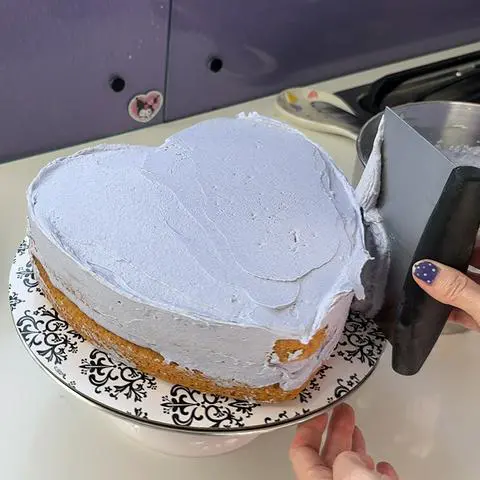
Prepare the frosting. If the frosting has been sitting for awhile, you want to rewhip it before starting on your final coat of frosting. If it was in the fridge overnight because you’re like me and you split this task into 2 days, leave it on the counter for an hour and then rewhip it. It should only take 2 minutes to remix it.
Prepare a piping bag. Use the same piping bag and tip you used when you made the border for the blueberry filling. Fill the bag with the frosting you just rewhipped. It should only take a minute.
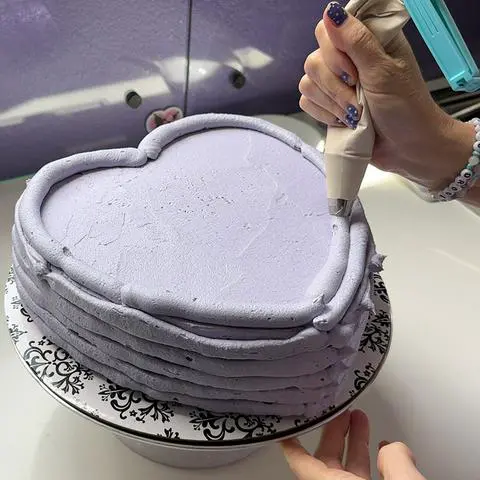
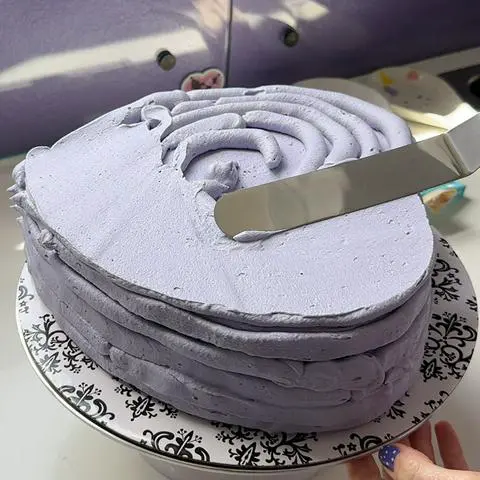
Frost the cake. Remove the cake from the freezer or fridge once the crumb coat is hard to the touch and set it on a cake decorating turntable if you have one. Pipe rings around the sides of the cake starting at the bottom and working your way up. Pipe with one hand and use your other hand to turn the cake turntable. Then pipe heart shaped rings around the top. Start at the edges and work your way toward the inside until the entire crumb coat is covered in frosting. Use an offset spatula to smooth the frosting on the top of the cake while spinning the cake turntable. Use a bench scraper/chopper to smooth the frosting on the sides of the heart cake. I like to hold the scraper at an angle that’s almost parallel to the sides of the cake. My video below shows this. This step took me about 15 minutes. Chill the frosted cake in the freezer (for 15 minutes) or the fridge (for 30 minutes). While you wait, prepare for decorating.
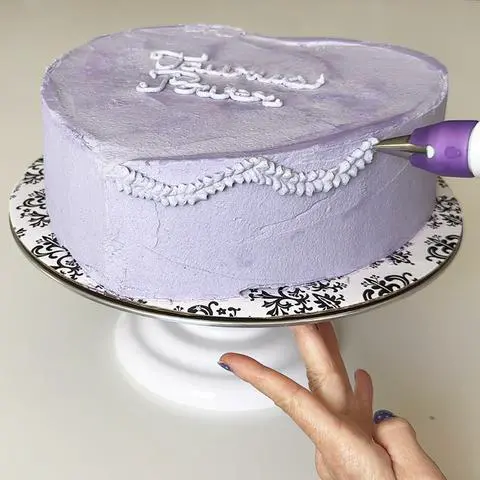
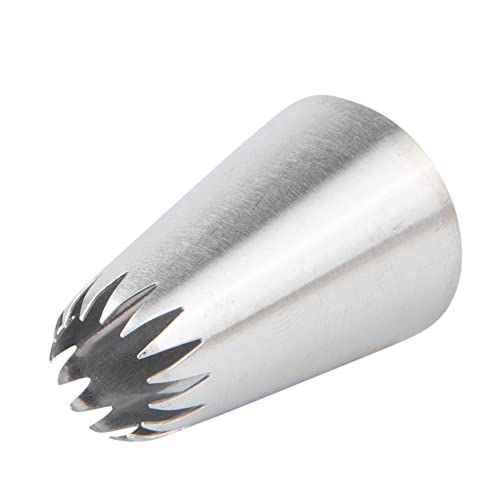
Prepare for decorating. Choose decorating tips that will allow you to get the design you want. If you want to decorate your cake the way I did, follow these instructions. Get out 2 piping bags: one for each color. Fit one piping bag with a Wilton large open star tip 6B and set it aside. This will be for the large shell border. You’ll fill this with your accent color, so I filled mine with black frosting. But don’t fill it yet. It’s better to wait until right after you whisk it so it’s fresh and easy to pipe. The rest of the tips will all use the main color. Fit a single piping bag with a Wilton twist quick decorating coupler so you can switch out the tips easily. Don’t fill it with the main color yet. Just gather all of your tips so they’ll be ready. I used Wilton small open star tip 32 for the reverse shell border, Ateco decorating tip 104S for large ruffles, Wilton leaf decoration tip 352 for small ruffles, and Ateco round tip 4 for drop strings and writing the message on top of the cake.
Clean up the cake. Remove the cake from the freezer or fridge once the frosting has hardened. Set it back on the cake turntable. Use a knife or your offset spatula to trim off any overhang on the top edge. You can put all the trimmings back into the mixing bowl with the rest of the frosting. This step takes a couple minutes.
Cake decorating may not be a skill you possess. Or maybe it doesn’t excite you as much as it does me. If you fall into that boat, I recommend decorating your vanilla cake with blueberry filling in vegan sprinkles.
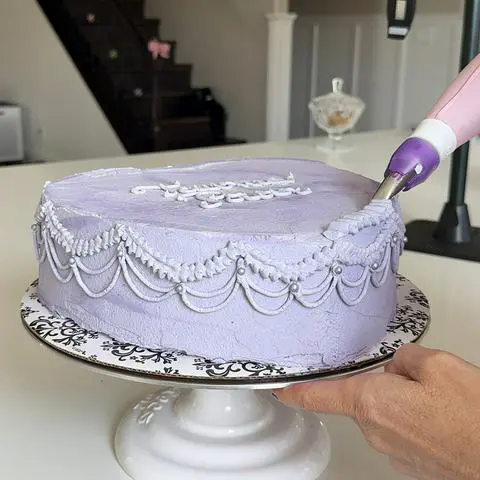
If you’re like me and you’ve been waiting patiently for the fun part to begin, guess what? It’s here! Grab all those piping supplies you got out earlier and let’s make this cake cute AF. If you plan to write a message on top of your cake, do that now before starting your piping. This way, if you mess up, you can scrape off the writing and start over. For hints on writing on cakes, check out my heart cake tutorial. Whip your frosting again, and then fill the piping bag that has the coupler on it with your main color. My main color is lavender. I traced my writing with a toothpick first, and it’s a good thing I did because it didn’t fit. It took me 5 minutes to trace the message twice and to write it for real. Chill the cake with the writing on top in the freezer (for 10 minutes) or the fridge (for 20 minutes).

Pipe the side ruffles. Remember that before you start, you can always practice on a plate before piping on your cake. I practiced for a couple of minutes before I was ready to make the ruffles on the actual cake. Then, use a toothpick to mark exactly where you want your side ribbons to go. I like mine evenly spaced, so I used a tape measure to be as precise as possible. Marking the spots took me 3 minutes. Use tip 352 with your main color of frosting to draw looping ribbons around the sides of the cake. Try to place them toward the top of the side as much as possible. This will leave room below the ribbons for the strings. It took me 5 minutes to draw my ruffle swags on the side. Chill the cake with the side ribbons in the freezer (for 10 minutes) or the fridge (for 20 minutes).
Pipe the side drop strings. It’s not a lambeth cake design without the drop strings, right? Right. These take a different kind of technique. I’ll try to describe it, but watching my video might help. You want to use tip 4 for these. Before you start, rewhip your frosting. Pipe the start of the string at the higher side making sure it’s sticking to the cake. Then you’re pulling the piping bag out while squeezing the frosting out so that the frosting is dropping in the air, rather than on the cake. Once you have the length you think you need, go back up to the opposite side and press into the cake so it sticks. You want to try to make each string the same length (I tried and failed haha). If one of the drop strings doesn’t stick at the end and falls, just remove it and start again. Once you’ve gone all the way around the cake, repeat it, but this time drop the drop strings slightly further down on the same path. If the tops of your drop strings look messy, you can add vegan pearls to those spots to make them look prettier. That’s what I did. Or you can add mini rosettes or all frosting decor to cover any messy looking spots. Piping drop strings and adding pearls took me a half hour. Chill the cake with the drop strings in the freezer (for 10 minutes) or the fridge (for 20 minutes).
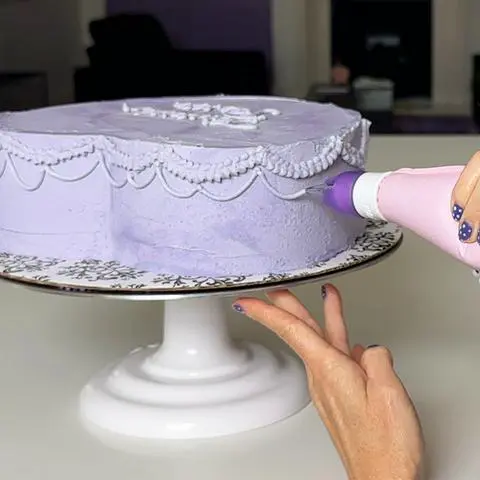
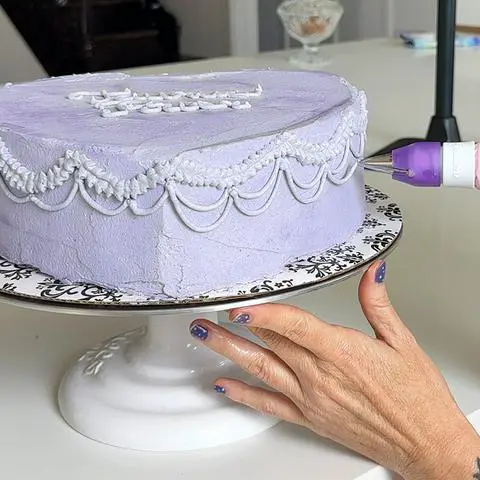
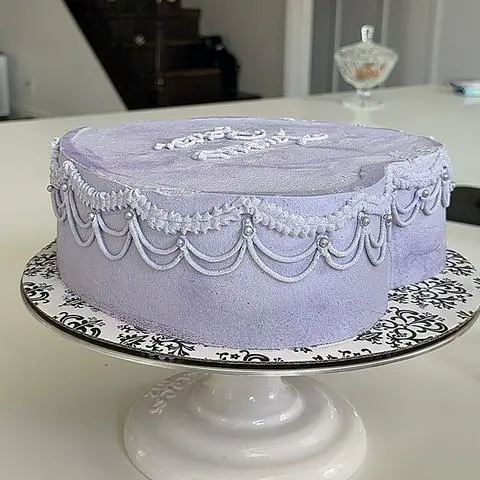
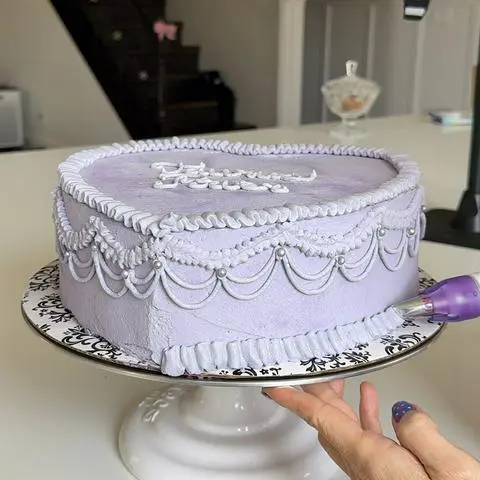
Pipe ruffle borders. Use tip 104 to pipe a ruffle border around the perimeter of the heart, both on the top, as well as on the bottom (where the cake meets the cake board). Use your main color (the same color you’ve been using this whole time). When you do the top ruffle, I like it when it sort of hangs over the edge a little bit. This took me 7 minutes. Chill the cake with the ruffle borders in the freezer (for 10 minutes) or the fridge (for 20 minutes). You can always leave the cake chilling for longer if you’re still busy coloring your accent frosting.
Color your accent frosting. If you haven’t made your accent color yet, color that now. My accent color is black. The easiest way to make naturally-colored black frosting is to add 2 tablespoons (12g) cocoa powder and ½ cup (56g) black cocoa powder to 2 cups of frosting. I learned this trick when I made my galaxy cupcakes. If it gets too thick, add plant-based milk or creamer by the teaspoon, mixing after each time you add some. Adding only a teaspoon at a time keeps the frosting from getting too thin to keep its shape.
Pipe the large shell borders. Use your accent color for the large shell borders. Use tip 6B for this. Pipe the shell borders around the top and bottom perimeters of the cake. Pipe them so close to the ruffle that they overlap it. This is especially true on the bottom border because the ruffle is more flat against the cake board, rather than being flat against the cake. So, when you pipe the large shell border on the cake, it covers a lot of the bottom ruffle border. I spent 7 minutes on the large shell borders. Chill the cake with the large shell borders in the freezer (for 10 minutes) or the fridge (for 20 minutes).
Pipe the medium shell borders. Use your main color for the medium shell borders. Use tip 32 for this. Either pipe the same style of shell border you did before or pipe a reverse shell border. I chose the reverse shell. If you haven’t done a reverse shell border, it’s kind of like you’re alternating between the letter S and a question mark (without the dot). Do this around the top perimeter of the cake, as close to the large shell border as you can without overlapping. You basically don’t want any of the cake to show. I spent 2 minutes on the medium sized reverse shell border.
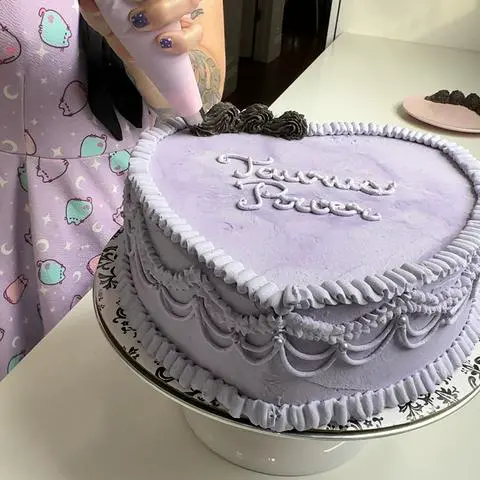
Add additional details (optional). At this point, you can be finished. Or if you want to keep going, you can use tip 18 to add rosettes and tip 352 for leaves on the rosettes. Or use tip 4 to add dots. You can add vegan pearls. I have a list of vegan sprinkles if you’re not sure where to buy vegan pearls. I added edible glitter spray to the entire cake.
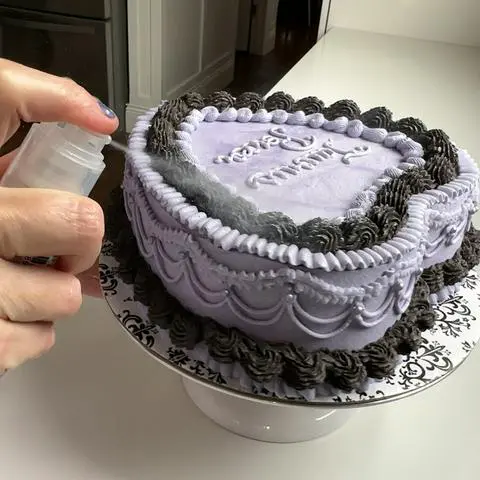
Chill the decorated cake. Chill the vintage cake in the fridge or freezer until you’re ready to deliver it or serve it. I’m taking my cake on a 2-hour car ride to a birthday party, so I will freeze it overnight before leaving.
Questions and Answers
Can I use this blueberry and vanilla cake recipe to make a 2-layer round cake?
You can definitely bake a round cake using this recipe. The only difference is the baking time. Instead of 27 minutes, you want to bake 2 round cakes for 32-37 minutes. In my oven, round cakes took 32 min, but my current oven runs hotter than any oven I’ve had in the past.
My drop strings keep breaking. What am I doing wrong?
Drop strings with vegan buttercream are a huge pain in the butt. Mine break too. When I have a few break in a row, then I put my frosting back into the mixing bowl and rewhip it. I also chill it a little bit before whipping. That usually helps a lot. But sometimes you just need to make shorter drop strings and be ok with that.
Ingredient Substitutions
- Nondairy Milk: You can use any kind of plant milk in the cake. For the frosting, the thicker and creamier it is, the better the consistency will be. I even use vegan coffee creamer if I have it on hand. Otherwise, just use the cheapest vegan milk you can find. If you use soymilk, I recommend buying organic or non-GMO. If you avoid soy, choose macadamia milk, almond milk, or oat milk.
- Vinegar: I usually use apple cider vinegar in my recipes because it’s supposed to be healthier (I actually don’t even know if that’s true, haha). The reason we use vinegar in this cake is to cause a chemical reaction to make the cake rise. Therefore, you can use any acid, like white distilled vinegar, lemon juice, or lime juice.
- Sunflower Oil: I recommend safflower, sunflower, avocado, or coconut oil for baking cakes. These oils are good for high heat, which helps you avoid transfats. However, you can use any other oil such as vegetable oil, canola oil, grapeseed oil, etc. People even make olive oil cakes, but I don’t recommend it. If you avoid seed oils, use coconut oil or avocado oil.
- Vegan Sugar: I use organic sugar to be certain that it’s vegan. You can use organic, vegan, or raw sugar. Watch out for conventional granulated sugar. It’s sometimes processed using animal bones, and therefore not considered vegan by some vegans.
- Vanilla Extract: If you don’t have vanilla extract, you can omit it. But if you want this to be the best cake you’ve ever had, make sure you include it. Most vanilla extracts and vanilla flavors are vegan, but not all of them are created equal. I always use 100% pure vanilla extract because it tastes better. If you have vanilla beans, vanilla bean paste, or vanilla powder, any of those would be suitable replacements. You can measure vanilla with your heart. It’s like chocolate chips.
- Flour: I use unbleached, all-purpose flour in most of my recipes because it’s the kind of flour every household usually has. However, if you are an experienced baker, you can replace the regular flour in this recipe with cake flour, spelt flour, or whole wheat pastry flour. If you use cake flour instead of all-purpose flour, increase the amount to just shy of 4 cups. Do you avoid gluten? Or do you have friends or family who are gluten free? Replace the all-purpose flour with a gluten-free flour blend to make this cake gluten free.
- Baking Soda: If you are out of baking soda, replace the 1 ½ teaspoon (9-10g) baking soda in this recipe with an additional 1 ½ tablespoons (24g) baking powder.
- Baking Powder: I use the non-aluminum kind, because I need all the brain cells I have left. If you’re out of baking powder, replace the ½ teaspoon (2-3g) baking powder in this recipe with an additional ⅛ teaspoon (1g) baking soda.
- Salt: I buy pink sea salt because it has trace minerals and micronutrients in it that our bodies need. However, you can use any salt in this cake recipe. You can also omit the salt entirely.
- Lemon: If you don’t have fresh lemon, replace the lemon in this recipe with 1 tablespoon (15g) of lemon juice. The consistency of the blueberry filling may be slightly less thick this way, but it still works.
- Cornstarch: I use organic or non-GMO cornstarch because corn is a highly genetically modified food. A replacement for cornstarch would be 2 Tablespoons (16g) arrowroot.
- Vegan Butter: The weight of 1 ¾ cups of vegan butter varies from brand to brand. I usually use organic whipped earth balance because I like the flavor and the consistency. 1 ¾ cups of organic whipped earth balance weighs 310 grams. But the same amount of Violife vegan butter weighs 385 grams. So, keep this in mind when you measure or weigh your vegan butter. If you avoid soy, buy the soy-free earth balance.
- Vegan Shortening: You can replace the 1 ¾ cups (335g) vegan shortening with the same amount of additional vegan butter or margarine. Just keep in mind that it will need to be chilled whenever it’s not being served because vegan butter starts to melt at room temperature.
- Almond Extract: Almond flavoring and almond extract can be used interchangeably. The only difference is that almond extract is in a base of alcohol and almond flavoring is in a base of glycerin. Just make sure you use pure almond extract or flavor.
- Powdered Sugar: If you’re not sure if your powdered sugar is vegan, read my list of vegan powdered sugar brands.
Video
Here is an insanely long video of me making and decorating this cake. It has bookmarks for each section in this recipe so you can skip around.
Comments or Questions?
If you make this recipe, I would love it if you’d snap a pic, post to instagram, and tag me @vegandollhouse. It seriously makes my day/week/month!
Please message me (instagram or email) if you have any questions or feedback about the recipe.
Similar Recipes
If you like this recipe, because it’s a fruity dessert, you should totally check out my list of vegan fruity desserts. Other birthday cake ideas are this pikachu marble cake, spring ding dong cake, or galaxy chocolate cake.
Here is a picture of Folvey with her birthday cake. If you want to see other pictures from her birthday party, I shared some on my personal instagram account.

☆☆☆☆☆☆☆☆☆☆
This post links to items I mention. If you click on one, you will go to a website (like Amazon) where you can buy the product. Sometimes, the store you purchase from (Amazon, Etsy, etc.) will pay me for referring you. This costs you nothing extra, and I would never recommend a product that I don’t use. These affiliate programs help me buy ingredients to create recipes for you. Read more about this in my privacy policy.
I mostly cook with organic ingredients, but only specify organic when it’s necessary to ensure the item is vegan.
☆☆☆☆☆☆☆☆☆☆


![ONE MORE [25pcs] 10" White Cakeboard Round,Disposable Cake Circle Base Boards Cake Cardboard Pizza Plate platter 10 inch,Pack of 25](https://m.media-amazon.com/images/I/41JwU6EVGIL._SL500_.jpg)


Rating:⭐⭐⭐⭐⭐
mantistoboggon -⭐⭐⭐⭐⭐ pastelblueviolet -⭐⭐⭐⭐⭐ That-Condition -⭐⭐⭐⭐⭐ mghkk -⭐⭐⭐⭐⭐ Evergreen_94 -⭐⭐⭐⭐⭐ NorahCharlesIII -⭐⭐⭐⭐⭐ queenstaceface -⭐⭐⭐⭐⭐ justalittlebleh -⭐⭐⭐⭐⭐ Aryyzara -⭐⭐⭐⭐⭐ Satansdvdcollection -⭐⭐⭐⭐⭐ Professional_Sky -⭐⭐⭐⭐⭐ berryveganplanet -⭐⭐⭐⭐⭐ Lynne -⭐⭐⭐⭐⭐ folvey -⭐⭐⭐⭐⭐ itsmethatherbivore -⭐⭐⭐⭐⭐ Chloe Hale-Ridings -⭐⭐⭐⭐⭐